 I’m often asked questions about how I think when I’m creating my art quilts, so I decided to start documenting some of the things I learn as I go along for a future book. I learn something new with each and every quilt, and “Dalton’s Garden”, one of my Meditation Garden series, is no exception. This series, based on my ability to tap into a person’s energy field, allows me to become “one” with the materials and play with the energy as ideas come into me. The result is a place where that person would want to energetically meditate and play.
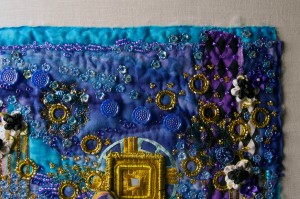
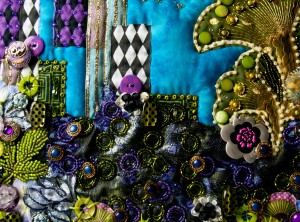
In the last two postings about this piece, I’ve mentioned that the black and white harlequin ribbon in the upper right was crooked. I was able to easily dislodge it from the surface about as far down as you can see in this photo. I then found some black and white ribbon roses in a local craft store. By alternating them on either side of the vertical length of the ribbon, I was able to disguise the slight crookedness that was still left. (There was just too much already sewn on top of the ribbon further down its length to take the whole piece up.) Also, part of the problem when cutting into grosgrain ribbon, as I did for that section, is that the more that you handle it, the more likely it is to unravel. By having to minimize the need to rip out stitches, I was able to decrease that chance of the ribbon unraveling just by adding on those ribbon roses.
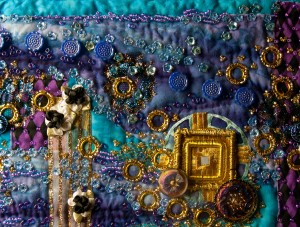
 There are a number of aluminum chain maille jump rings in several colors out on the market now in craft shops. I like to use circles in my work (probably that button thing I’ve got going.) In the past, I have fastened down the circles with large stitches of 6 stranded embroidery floss. Here I choose to use 3-4 stitches of quilting thread in as close of a color as possible to that of the ring, and then encircled each ring with shiny, size 8 seed beads in a similar color. I’m really pleased as to how they surround the main portal in this shot, and suggest alternative windows to access the scene, or perhaps bubbles of laughter…or both!
I’m also pleased as to how I handled the horizontal clouds in the purple blue batik fabric. In the past two blogs about this quilt, I’ve talked about how I was afraid that I would cover up too much of the beautiful “drips” of dye. When my eyes are only a foot away from the surface on which I’m working, it’s easy to get caught up in the fun of the beading process. This time, instead of sewing right on top of certain areas with beads of similar colors, I sewed right above those areas in more blank spaces. This was especially successful with the dark areas that are so critical to have these clouds say “thunder clouds”. In those spaces, I sewed very large dark purple size E seed beads flat against the surface. That way you can see the different colored interior of the bead better than when they’re sewn with the sides showing.
 In the water at the bottom of this piece, I used two colors of the aluminum chain maille links. The dark green ones were encircled with a dark green, size 8 seed bead that had an amber center that makes those circles glow much more than they do in the this photo. For the purple chain maille links, I only has a more “flat” color of seed beads to encircle them, so those areas don’t glow as much as the green. The green lily along the top edge now has some flat, dyed shell beads that I’ve used to add shine along that surface. Underneath them, I used concave bead caps that have green pearls sewn in the center to accentuate the gold embroidery that came on the lilies. A problem that I need yet to solve is how to treat the lines of gold embroidery running the length of the lilies. My first inclination is to use size 10 seed beads ( the smallest I can still see to thread a needle that will go through them and fabric) and trace some of the lines running down the lily. Another problem I have to resolve is how to handle the bright aqua backing fabric. There are very subtle areas of slightly darker areas, and I think that I’ll used the edges of the batik swirls to suggest where and how to bead.
Working in any artistic medium is all about problem solving. How do I add this? What do I already have that will make this area work? How can I make my work stand out and speak with my style or voice? Answering all of these and similar questions are just some of the issues each artist must ask and then, in my opinion, listen to what their heart has to say about an answer for that moment. Perhaps in the next piece, the answers will change, but then, that’s what makes creating art so much fun…what’s going to happen next?
What have been some of your biggest discoveries been about your own medium? For myself, I find that I often learn more from other disciplines than I do from the one with which I’m most familiar, art quilting, so I’d really like to hear yout thoughts.
Why not leave a comment as to your thoughts on this posting. Please take a minute, fill out the form below or by clicking on the “comments/no comments link” at the top of the posting, and then share your ideas with the rest of us. We all grow when we share our thoughts and impressions, so why not join our growing community of those who appreciate art quilts and textile arts. We’d love to hear from you!
You can see more of my art work on my web site at www.fiberfantasies.com (be patient as it loads; it’s worth it) and can find me on Google + , Facebook, and Twitter.
To find out how to buy my art work, please check out “How to Buy my Art Work” in the “Pages” section to the right of this blog.

It’s hard to see your overall design when you are working so closely to it. I have made it a habit to try and end my working sessions by putting my work on the design wall or at least stepping back for a good long look at the ‘big picture’. It helps in seeing some issues before they become problems.
You are so right about stepping back to take a look every so often. The problem is that I have such short distances to utilize. I still find that my eye gets fooled and need to use a camera to show me what I’m glossing over.
No excuses, now! Even the distance from the head of your bed to the foot of your bed is enough! But the camera does capture what our eyes gloss over, so that’s a valuable resource to study those details.
Sounds like you’re calling me to quit being so lazy and get my nose away from these seductive beads…:)Thanks. Kathy. for the loving, yet firm encouragement!