 In this second posting on decorated ostrich eggs, this first piece is called “Sea Egg”. The top side had had a small crack in the top, so the man who gave me the eggs had cut an oval shape out of it. While embellishing this egg, I thought of Bella Isola in Lake Maggiore in the north of Italy. One of the memories that stands out the most for me from visiting that beautiful palace is the grotto room downstairs that is encrusted with thousands of sea shells. In tribute to the beauty of the palace, which had been built as a wedding present, I dedicated my much smaller scale version of a sea egg.
The focal point for me was a motif of aqua lace glued near the bottom of the opening. It had tendrils dangling from it that reminded me of sea weed. I also found some great metal buttons of starfish, and after cutting off the shanks, added them to the composition. The entire egg (about 7″ or 18 cm tall) is glued onto a horn bracelet, which is then glued into a margarita glass that had a blue and green rim that reminded me of the sea.
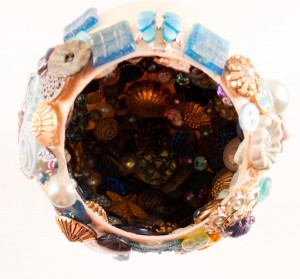 In this view of the inside of the egg, I had to make the outside over exposed in order for you to see some of the embellishments. With the aid of long forceps used to put small plants into terraiums, I used E-600 glue to secure the buttons and beads into place. That often meant holding the button, especially on the sides, for several minutes until the glue had dried enough to hold. Some people have asked why go to so much effort, when most people won’t see the inside. As a child, I remember reading about how the ancient Greeks had finished off the backs of their statues as well as they had the fronts, even though they would be placed against temple walls and no one would see them. The concept was that these sculptures were being made for the gods, and while I do not put myself into the same category, I like the concept of completing work in places where no one will see it. It’s as if that area is a secret between me and my muses, much as the ancient cave artists who went deep into caves to compose their wall paintings that few people would see at the time.
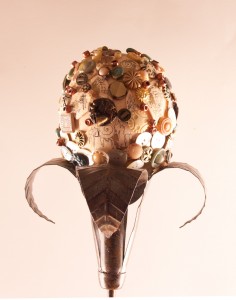 This piece is named “Artifacts Egg”. In the previous posting, I mentioned about how poorly packed ostrich eggs are when shipped from farms here in the States. Since I had a number of small, cracked pieces, I scribbled on them as if they were pottery shards from an ancient civilization of my own creating. I added on some more of my buttons and beads to complete the composition, and then glued the entire egg into a tall 4′ or 122 cm candle holder. The top of the holder had splayed leaves, which I thought would make a great counterpart to the oval egg. The trouble was getting the glue in the right places on the metal holder, so that the egg would stay centered and stay upright. The base of the pole that holds up the egg is a bit wobbly, so I’ve weighted it down to prevent flying cats from sending the whole sculpture crashing to the floor.
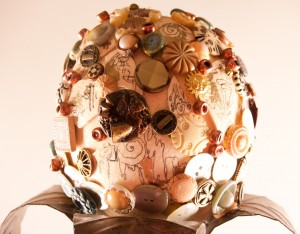 If you look to the bottom and left of this detail pic, you can see some of the shards I was talking about. I used an ultra fine sharpie pen and doodled on the shell fragments. You can also see on the left just how thick the actual shell can be by looking at the edges of the pieces. There was one point early on as a child that I thought being an archeologist would be the coolest profession… sort of like a continual Easter egg hunt. It was later in life that I learned about what hard and dirty work it is, and mostly out in the blazing sun. I content myself these days to making my own artifacts, where I can control the environment and not have to hike to get my materials.
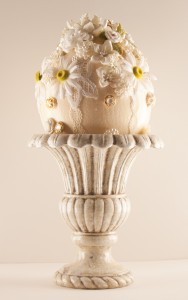 This last egg was an attempt of mine to make some that would be affordable. I was going after the wedding market, and thought that these eggs would make great centerpieces for reception tables. I bought a number of pottery vases and then proceded to decorate the eggs. However, at $75 US retail was about as much as I would be able to charge, and that meant that I would be working at way below the minimum wage.
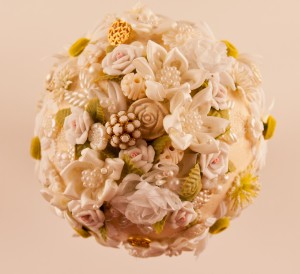 This view of the top of the egg, which I thought was the angle that would be the most seen, shows the hundreds of buttons, beads, and silk and ribbon flowers that I glued onto the egg’s surface. Each one had to be glued, and held in place for about a minute for it to set until the next one could be added. I love the “wedding cake” look of this egg, and I hope that some day, it will grace a wedding as it was intended to do.
Much has been written about Faberge’s enameled eggs, created for Czar Nicholas of Russia to give to family members, but another egg artist, Mitzi Perdue, is from my home state of Maryland, USA. She was married to the “Chicken King” of Maryland’s eastern shore, Frank Perdue. She had a back injury for a year and thought that it would be nice to be “The Egg Lady” and developed a natural interest decortaing eggs, given that there were so many in the family business. Her sculpted eggs and sea shells are a delight, so do check out the link above.
Have you used unusual materials in your works of art?
Why not tell us about them and leave a comment as to your thoughts on this posting. Please take a minute, fill out the form by clicking on the “comments/no comments link” at the top of the posting, and then share your ideas with the rest of us. We all grow when we share our thoughts and impressions, so why not join our growing community of those who appreciate art quilts and textile arts. We’d love to hear from you and how you’re being creative!
You can see more of my art work on my web site at www.fiberfantasies.com
To find out how to buy my art work, please check out “How to Buy my Art Work” in the “Pages” section to the right of this blog.

Leave a Reply
You must be logged in to post a comment.