Thread painting, or using your sewing machine to create an image is a technique that I’ve always admired. About two years ago, I had the opportunity to take a workshop from Susan Levi-Goerlich, a local artist whose work I had always admired at the Baltimore Winter Market, a craft show sponsored by the American Craft Council. I got on her mailing list, and was excited that she was giving a workshop on an introduction to thread painting.
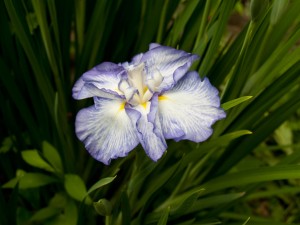
It had been awhile since I had picked up my sewing machine (which once upon a time had been considered portable), but I think it had gained weight since I had last used it. There was also an extensive list of materials, especially threads to consider, so I brought as many as I could carry. Then, there was the ever important photo that we were going to use as an inspiration. I chose a pic of one of my beloved Japanese irises, and fortunately was smart enough to pick one that had a single flower in it.
The first part was stretching the fabric taught into a sewing hoop that had been wrapped with bias tape so the fabric would really grab in the hoop. Instead of sewing with the fabric on top of the hoop, as in regular hand embroidery, the fabric is on the bottom of the hoop. The presser foot (machine sewing foot that is next to the fabric) is taken off and the feed dogs are lowered. (They’re the little track-like treads that help move the fabric through the machine). Then the hoop is passed under the needle, and since my hoop was kind of thick, I kept breaking needles. (I just now realized that I could have put the needle in afterwards, once the fabric in place…hindsight is always so accurate!)
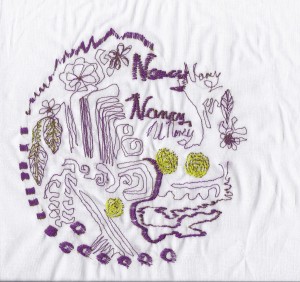
Then, the needle becomes your pen or pencil, and the fabric your paper, but in this technique, the “paper” moves and the pen stays still. At first we practiced making loops and circles and then writing our names, as you can see in the first photo above.
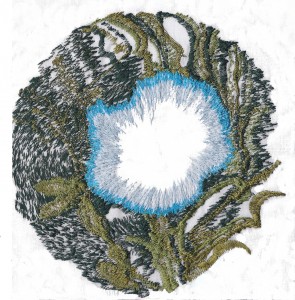
In thread painting, you start with the background, and then move towards the foreground. It’s impossible to get every single blade and leaf in the picture, so you try for sort of a general blur for the background with a few larger, better formed elements, such as large leaves, that are closer to the viewer. You need a tremendous amount of colors from which to choose, so that you can create depth and distinguish leaves. I think that over on the left side of this photo, I was more drawing what I think the leaves should look like than what I actually saw. I got very tired, very quickly, working with just greens, so I moved on to the center section where the iris was in the photo.
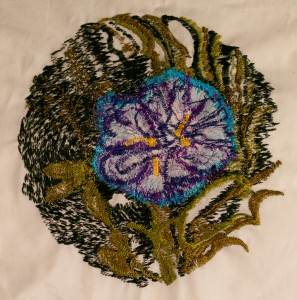
This final photo shows how I interpreted the iris. While the flower is pleasing to look at, I don’t think that I did a good job of portraying an iris, and was more sewing what I thought it should look like rather than actually portraying what I was seeing. One problem is that the more you overlap the different colors of threads, the thicker the layers become, until you reach a point where you may have to switch to a thicker needle to get through all of the layers.
I really appreciate those who have dedicated themselves to thread painting, as just for the sheer physicality of moving the fabric around on the sewing machine for hours at a time. I imagine that the above piece took me about 15 hours to complete, and it’s only about 6″ or 15.5 cm in diameter. You certainly have to get up and stretch every so often and have good posture, or your upper back really starts to hurt. However, most art forms have some sort of hazard; I have to sand my fingertips every so often from the pin pricks from sewing on so many beads.
Have you ever done any machine embroidery or thread painting? How did it go for you, and do you have any tips to share?
Why not leave a comment as to your thoughts on this posting. Please take a minute, fill out the form below or by clicking on the “comments/no comments link” at the top of the posting, and then share your ideas with the rest of us. We all grow when we share our thoughts and impressions, so why not join our growing community of those who appreciate art quilts and textile arts. We’d love to hear from you!… and PLEASE tell like minded souls about this blog! The more readers and contributors, the more I write because encouragement helps the words flow!
You can see more of my art work on my web site at www.fiberfantasies.com (be patient as it loads; it’s worth it), my spiritual healing work at www.transitionportals.com and can find me on Google + , Facebook (for Transition Portals) Facebook (for Fiber Fantasies), and Twitter.
To find out how to buy my art work, please check out “How to Buy my Art Work” in the “Pages” section to the right of this blog.


Leave a Reply
You must be logged in to post a comment.