 I suppose that it’s quite appropriate that this week, marking one year of posting on this blog, that I talk about finishing an art quilt. “Circle of Black, Circles of White 7″ is finally finished and ready to put the binding on. While this stage isn’t much fun, it is so critical that the opposite sides be the same length and the corners be squared, as that’s will make the piece appear more professional when ti’s hung on the wall.
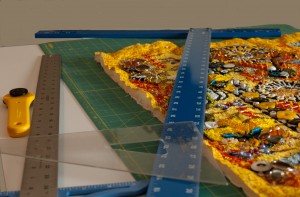
You can see on the side of the quilt the tools that I use to even up the edges before putting on the binding. On top of my fold out table that I use just for cutting, I have a green self-healing mat. There are many out on the market, but I like this version as it has grid marks printed on it. The Olfa rotary cutter is perfect for trimming off the little smidgens of fabric and batting that keep the sides from being even. The pieces that I do mostly now are approximately 3′ x 4′ or 91.5 cm x 122 cm. That size is small enough so that I don’t have to haul out a frame, as the embellishments can get to be pretty thick. The result of not using a frame, however, is that the pieces can get slightly distorted in the construction process, and so this final cutting to even the sides is really important.
I have two sizes of T-squares to use to run the rotary cutter against. The larger one is really heavy and measures about 48” or 122 cm tall of usable height. I bought it in the tools department at a local hardware store and it’s a much sturdier surface to cut against than the smaller one shown above that you get in the drawing supply section of an art store. Sometimes, the larger buttons have to be temporarily removed so that the rotary cutter can pass by them. They then are sewn back in place after the sides have been trimmed. The last piece of equipment you can see is a clear drafting triangle. That is invaluable for making sure that the corners are cut squarely and that the corners are folded neatly and evenly after the binding is put on.
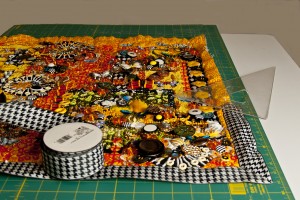
 Here is a view of me starting to put the binding on the edge of the trimmed quilt. I used to make my own bias, but I find it so much easier to use a wide ribbon for that purpose. It needs to be at least 1.5″ or 3.75 cm wide and easily draped, so that it will turn the corners easily. That need for easy folding eliminates many of the heavier grosgrains that are out on the market. I try to keep the embellishments at least 3″ or 7.75 cm from the edge of the quilt as I’m constructing it, because as the sides are being trimmed, it’s often surprising how much fabric is lost to even out the edges. Sometimes, the ribbon binding may cover up some of the small, size 10 and 11 seed beads, but if there’s a larger element, it may have to be removed. Hopefully, if it’s a larger button, the binding can fit under the edges and the button will just overlap out over the inner edge of the binding. Sometimes, when holding the quilt up at the end to check on the visual balance, I’ll sew buttons or larger elements out into the binding to make the piece appear more balanced to the eye.
I usually start sewing the binding up a little ways from the lower right hand corner. That way, the overlap of the rest of the binding doesn’t seem to show as much. When I get to a corner, I fold the ribbon at a 45 degree angle and start the binding heading off on the new side. I pin the binding in place along a whole side so that it will be even. Before I get too far sewing along a side, I check the corner with the drafting triangle to make sure the corner is even, before I’ve sewn too far along an edge and have to rip out the binding that I’ve sewn down. I find it’s better to measure as I go along, rather than have to take out stitches later.
Measure, measure, measure! It’s not particularly rewarding work, but crooked corners and sides that are supposed to be straight and aren’t can be so distracting. Many people can see discrepancies as small as 1/8″ or 3mm, and will spend all their time looking at them rather than the great work that you’ve done. I’ll detail out more information on finishing up an art quilt in my next posting.
What tricks of the trade have you learned about finishing an art quilt? What do you do to indure that the edges are even and the corners squared?
Why not leave a comment as to your thoughts on this posting. Please take a minute, fill out the form below or by clicking on the “comments/no comments link” at the top of the posting, and then share your ideas with the rest of us. We all grow when we share our thoughts and impressions, so why not join our growing community of those who appreciate art quilts and textile arts. We’d love to hear from you!
You can see more of my art work on my web site at www.fiberfantasies.com and can find me on Google + , Facebook, and Twitter.
To find out how to buy my art work, please check out “How to Buy my Art Work” in the “Pages” section to the right of this blog.

Leave a Reply
You must be logged in to post a comment.