Tag Archive for fiber art

Going Around in Circles – On Purpose!

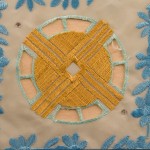
Detail of embroidered gold orb on organzaWhile I often bemoan when I feel the futility of when I’m “going around in circles” in my life, sometimes I want to do that, or at least include them, in my art work. (Maybe it’s my love of buttons, most of which are round.) The detail shot on the left is a circle that I coveted to have as part of my fabric stash. It’s a golden orb about 3 ” or 7.5cm in diameter, on a field of pale blue organza and embroidered flower motifs that I bought just for the circles. I knew at the time that I would never use the rest of the fabric, it was really expensive, (about $35/yd(m)), but I HAD to have it. You understand, right?

Detail of orb motif used in the art quilt "Butterflies and Beachballs"In the center and to the upper right of this detail shot is how I used those orb motifs in the art quilt “Butterflies and Beachballs“. The wedges of the circles, I filled in with gold beads, but left the arms of the orbs uncovered. Despite the opinion of many, I do not cover every square inch of the surface area of my art quilts. I do like to leave some of the original fabric to show through so people can get a sense of what the material looked like before my beading instincts took over.
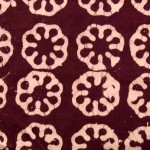
Batik fabric circlesThese batik fabric circles were used a lot in my early quilts. I used them so much, that a friend finally wailed,”Nance, quit using those batik circles!”. I like motifs that have distinct delineation between themselves and the background color and clean divisions in the parts of the interior of the designs. Fortunately, I still have a lot of this fabric left, as it was purchased back when I bought 3 yards of any fabric I thought I’d like. My budget often puts on some constraints. However, an even bigger consideration is the bend in the shelves on which the fabric is stored. Who knew that a “few” lengths of dress-weight material could create such a weight load.
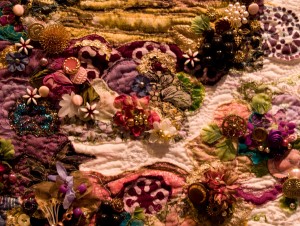
Detail of batik circles in the art quilt - "Dinner for Three on the Banks of the Cabernet"The batik circles worked well, I feel, in this detail shot of “Dinner for Three on the Banks of the Cabernet” -1993. It’s from my “Wines of the World” series, which I’ve yet to write about. The inspiration for the piece was a lagoon that I saw in the savannas of Venezuela which was purple/red (like a Cabernet) from the tannin in the local vegetation. The batik circles here played off the rubber/plastic grape clusters that were sewn to the surface of the quilt. In the upper right is an example of one of my early attempts to stencil on to fabrics. I quickly gave that up, because at the time, there were no textile paints intense enough to give me the color saturation that I wanted.
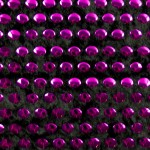
Metallic circles bonded to velourSometimes I cut my own circles if the size is not what I wanted. These metallic circles (about 1/2″ or 1.3 cm) are bonded onto a short pile, black velour. This is one fabric that I wish I had bought more of as I found out the hard way that the metallic foil, while thicker than sequin material, melts when you try to iron it. Sigh… I found a good brand of iron cleaner in the local fabric store in the notions section that got the sticky mess off the sole plate of my very expensive iron. It lived to iron another day. When I was little, I hated to iron my father’s shirts, and tablecloths. Who knew that I would pick a profession that often requires a lot of ironing, Of course, I don’t iron my own clothes!
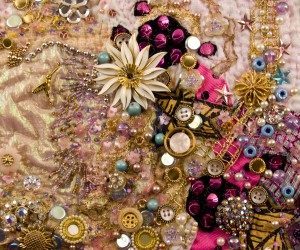
Detail of art quilt - "Laughter"This is a detail of the art quilt, “Laughter“.Showing in the top middle and bottom right of the photo is where I made circles out of circles from the shiny fabric shown above. It was a little hard to cut between the velour to make the circle because of the alignment of the foil circles. Even harder was to cut out individual circles and attach them, as there was so little fabric around each circle to sew into. That experiment with the individual circles was quickly abandoned. There are also some of my favorite embellishment materials, shi-sha mirrors from India, here shown in the bottom of the photo, banded in gold and edged with tiny pearls.

Going around in circles, or at least using them as design elements in my art work, is not such a bad idea. There are lots of round materials from which to choose, as the shape tends not to catch on things when used on clothes and slips easily through buttonholes. Besides, it’s a great conversation starter when asked what do I do for a living. I can blthely say, “I go around in circles. However, only the very best ones!”

 What are some of your favorite shapes to utilize in your art work? Why do you think that you’re drawn to them?

Why not leave a comment as to your thoughts on this posting. Please take a minute, fill out the form by clicking on the “comments/no comments link” at the top of the posting, and then share your ideas with the rest of us. We all grow when we share our thoughts and impressions, so why not join our growing community of those who appreciate art quilts and textile arts. We’d love to hear from you!

You can see more of my art work on my web site at www.fiberfantasies.com

It’s Elemental – Bones, Shells, and Wood

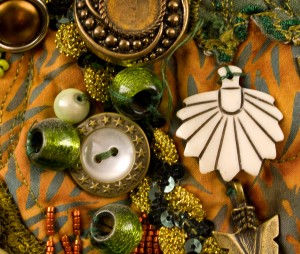
Detail of fan shaped pendant of carved boneHaving recently come back from a shamanic creativity retreat, it’s appropriate that I would be drawn to some of the more simplistic materials that I like to use in my work. Egyptian glass beads date back to about 2,500 BC and the glass seed beads that I love so much are relatively recent in origin.

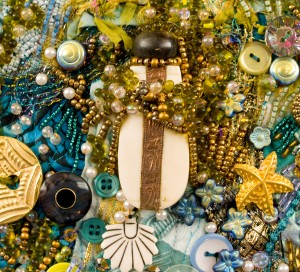
However, in this posting, I’ll speak to some uses of bone, shells, and wood embellishments that I’ve used in my art quilts. The photo above shows a detail shot of a white fan shape carved out of bone. It was used in a piece of mine “Elements – Earth“. Many of these simple carvings that are out on the market today are coming from Africa, and are being produced in response to the justifiable ban on ivory. You can still get much of the same look as the antique ivory carvings without having to kill a wild animal.

Wooden beads used in an art quiltFrom the same art quilt, “Elements – Earth”, here is a close-up shot of some golden wooden beads. They’re about 1″ or 2.5 cm in diameter, and about 3/4″ or 2 cm tall, so they make a lovely rounded shape on the surface that suggested to me mushrooms on a forest floor. I attached them with a contrasting thread, so there would be another small design element that would only be seen upon close examination, much like the treasures that can be observed in the woods when you’re down on your knees.

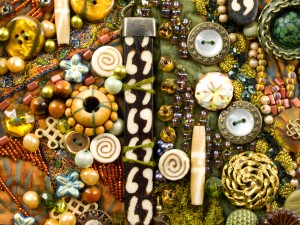
Striped bone pendant used on an art quiltFinally, from the same quilt as the above pictures, is a painted bone pendant in the center of the photo. Another carving from Africa, the dark painted background was stenciled onto the natural coloring of the bone. The piece only has one place for attachment at the metal bail (the piece at the top that allows for the pendant to be hung from a necklace). Since it’s almost 3″ or 7.5 cm, I used green embroidery floss to stitch the piece to the surface of the art quilt, suggesting vines or tree roots that capture other substances to the Earth. To the left, is another wooden bead, and peaking out behind that bead is a filigree carved bone piece. The fret work or spirals are much thinner and more delicate than the fan shaped piece above, and took more skill to carve.

Bone bottle used in an art quiltFrom this art quilt, “Elements – Water” is a detail shot of a bottle carved from bone from North Africa. My understanding is that it was originally intended for liquid incense or perfume. When I bought 10 of these, (and another 10 in a dark color), I had no idea what I would use them for, but thought that they were pretty cool and NEEDED to have them. This version has a wooden top that screws into place and an embossed metal band down the middle to add visual interest. I attached it by stitching multiple strands of beads to simulate sew weed covering up treasures on the ocean floor.

Slice of a small conch shell used on an art quiltThe vertical slice through a small conch shell, 1 1/2″ or 4 cm, shown on the left, adds to the feel of an underwater scene. Again I used strands of green beads and plastic pearls to suggest how the ocean claims what lands on its floors as vegetation grows over them. In contrast to the stark whiteness of the shell is one of my favorite glass buttons from Czechoslovakia, to the left of the shell, whose shine mimics the gleam of sunlight playing in the depths of shallow water.

Slices of small conch shells used in an art quiltFinally, from the same water quilt, are three small slices of conch shells in the center of this photo (3/4″ or 2 cm). While all of the slices had a hole drilled at the top for securing onto a necklace, I needed to make sure that the bottoms didn’t stick out as they would catch the beading and quilting threads as I worked in that area. Again, to make that fastening happen, I sewed vertical strands of green beads to simulate sea weed.

While I have often raided hardware stores for metal toothed washers and plastic stars/flowers to support the edges of mirrors, I am drawn to the primitive quality of natural materials. Mankind made do for thousands of years with what was available for personal adornment, and materials for rituals. While I am drawn to the shine of glass buttons and beads, perhaps I’ll be using more natural materials, especially if I end up on a desert island like I posted about last week.

Have you used any unusual materials in your own projects? 

Were they purchased or did you make them yourself?

Why not leave a comment as to your thoughts on this posting. Please take a minute, fill out the form by clicking on the “comments/no comments link” at the top of the posting, and then share your ideas with the rest of us. We all grow when we share our thoughts and impressions, so why not join our growing community of those who appreciate art quilts and textile arts. We’d love to hear from you!

You can see more of my art work on my web site at www.fiberfantasies.com
Gardens of Yellow & Butterflies – Another Work in Progress

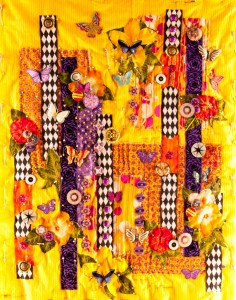
Full shot of an art quilt in progress - :Gardens of Yellow and Butterflies"I recently gave a presentation to a local Brandeis University Committee that supports the University and its libraries. I wanted to have a work in progress piece to show them how an art quilt is made, with its messy quilt sandwich, the untrimmed backing fabric,  and the middle batting sticking out. I also knew that I would be traveling soon, and that an art quilt the usual size of one of my larger pieces would take up a lot of room and weight in my carry on luggage. So the day before the presentation for the Brandeis group, I cut out this smaller art quilt (approx, 24″ W x 30″T, or 61 cm W x 76.5 cm T), “Gardens of Yellow and Butterflies” to demonstrate how an art quilt looks when it’s first being made.

The photo above shows this quilt, two days old, with the fabric pieces pinned into place. There are numerous safety pins up the middle and around the edges that keep the three layers from shifting too much as the sewing progresses. I like using safety pins rather then large basting stitches to hold the quilt sandwich together, as the safety pins can be opened and the fabric repositioned as is inevitably needed as I bead and quilt,as I don’t use a quilting frame. Rather, these pieces are sewn on a large sketching board that is clamped to a small, folding TV tray with quick release clamps from a hardware store. (Check this link to an earlier blog and scroll to the last pic to see the set-up.)

Detail of art quilt work in progress - "Gardens of Yellow and Butterflies"Here is a detail shot of the art quilt at that early stage of construction. You can see a vertical safety pin in the center yellow fabric as large areas of the same fabric tend to have bulges in them at this stage. There are the also visible white heads of lots of straight pins holding some of the pieces of fabric and ribbons in place. I love using ribbons, usually as  a vertical accent, but the black and white harlequin grosgrain ribbon stretching from the middle to the bottom right in this detail photo has already shifted. At this point, I’ve sewn some buttons and beads already onto the top of it, and rather than rip all of those out at this stage, I’ll use other elements as the piece progresses, such as sewing a large button on top of the ribbon near the bottom, to distract the eye from noticing that that ribbon is crooked.

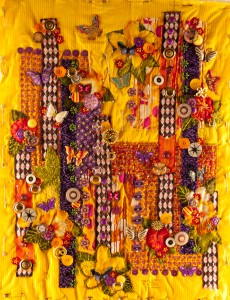
Full view of "Gardens of Yellow and Butterflies" - two weeks laterThis full view photo was taken two weeks later from the first full view above. A lot of the colored fabric shapes have settled into place, as the edges have either been sewn down, and the straight pins removed or they’ve been beaded down. The yellow background fabric, which is actually two different colors of thin yellow stripes, is still the most wrinkled, and will continue to be until that large area has been beaded down. I can see also that while the black and white ribbon in the middle, extending to the bottom’s crookedness has been disguised with buttons to distract the eye, the same longer ribbon on the far right needs something done to make its top appear straight. It is always amazing to me that what I see with my eyes looks fine, and I don’t see areas I that need fixing until I see a photograph of it.

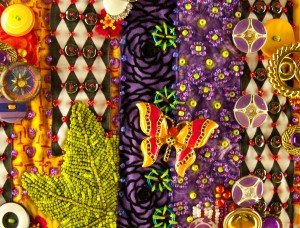
Detail of the art quilt - "Gardens of Yellow and Bitterflies", taken two weeks later from photos aboveThis later detail photo is taken from the same lower right corner as the detail shot above. The centers of the black diamond shapes in the black and white ribbon have now been filled in with hematite colored glass rondelles, held in place with a red seed bead. Larger sized red seed beads were sewn at the points where the black and white diamonds intersect. The green leaf is completely covered with different colors of beads, with 1 sq in or 2.5 sq cm equalling 1 hour’s work. The purple and black ribbon in the middle of this photo has purple seed beads sewn along the edges and at various places, there are aqua jump rings, sewn in place with lime green embroidery thread. This is because that ribbon has a wire edge, and while the edge will lie flat, the middle of the ribbon often doesn’t.

It has taken me over 30 years of being an art quilter to get command of most of the materials that I use. At this point, if I can think it, I can make it, so the actual construction techniques are no longer an issue. All of that practice frees me up to just be with the piece as I’m working as we speak and dance with each other. That connection can be quite an exhilarating experience sometimes and the joy I experience is what keeps me sewing, often through long hours into the night.

What are some ways that you’ve learned to cover up “mistakes” in your medium? Do you even see them as mistakes, or more as learning opportunities?

Why not leave a comment as to your thoughts on this posting. Please take a minute, fill out the form by clicking on the “comments/no comments link” at the top of the posting, and then share your ideas with the rest of us. We all grow when we share our thoughts and impressions, so why not join our growing community of those who appreciate art quilts and textile arts. We’d love to hear from you!

You can see more of my art work on my web site at www.fiberfantasies.com
To find out how to buy my art work, please check out “How to Buy my Art Work” in the “Pages” section to the right of this blog.

Feathers to Tickle your Fancy (1)

A feather necklace I bought in HawaiiIt doesn’t take much to tickle this Nancy’s fancy, as I  am easily amused, but feathers are certainly high on my list of favorites. Whether feather earrings, boas, fans, or this necklace that I bought in Hawaii, I have always enjoyed objects that include gifts that I find from birds. At one point, I looked into buying a pair of Sally Rand fans. She was a burlesque dancer in the 1930s and her trademark became her huge ostrich fans that have been copied by exotic dancers and show girls for their performances. However, at $150 US each, that seemed like a lot of money for an amusement. (Although I think you can get them cheaper now on eBay and Etsy… maybe some day.)

The peacock feather necklace above I bought in a gallery in Kauai, Hawaii. Having seen and worn a number of flower leis while there, I was delighted to find out there was also a tradition of making feather leis and capes in that region which would last much longer. This necklace and earrings were one of those things that I had to buy, and I have enjoyed wearing them quite a bit. While the necklace is over twenty five years old now, the feather tips are still joined into the base with macrame knots as tightly done as when I bought it.

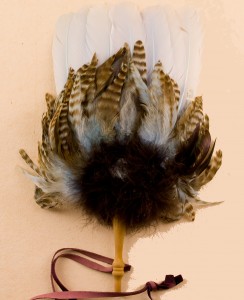
Feather fan with mirror on the backThis blue and brown fan I bought at a Renaissance festival along with a matching feathered pouf that could be clipped into my hair. The fan has a  3 in. (7.5cm) mirror on the side that faces you should you care to admire yourself or fix your make-up. Again, this was one of those “must-have” purchases. When I was in high school in NC, I went to a “charm school” in the 60s, where I learned useful life skills such as how to carry a fan. (Having a bend in your wrist so that your hand is crooked upwards is the key element.) There’s something quite elegant about carrying around a fan, no matter what the outfit, but feathers help to make what you’re carrying special.

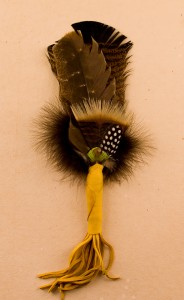
The next fan below is one that is used for “smudging” during various rituals. Burning sage brush bundles or sweet grass is a way many societies use to cleanse the energy before having a gathering. I have a large abalone shell to catch the ashes as the fumes waft through the air. The handle on this smudging fan is wrapped in doe skin and adds to the visual and textural appeal of holding the object.

Feather brush for smudging ceremoniesI can’t think of a more beautiful way to “clear the air” than using one of these lovely fans. Too bad that more of these ancient rituals aren’t used to create a ceremony before a discussion is held. They can add a sense of importance to what will follow, and perhaps convey to the participants that what will transpire is significant.

I once had a shamanic friend that would run his fingers along the edge of a large hawk feather as he held it up to his ear. He got answers to his questions by listening to how the barbs fell back together as his finger passed along their edges. He spent a lot of time out in the wild, and had learned the different calls that the various birds made, so it seemed only natural for him to use such a device to gain knowledge about what he wanted to know. Since he wore the feather in his hair, he always had it at the ready, should he need to know something. For him, it was much more efficient than looking up something on the Internet, and connected him to his environment. While I don’t have those skills, I do have a great appreciation for the lightweight, yet powerful feathers that can lift a bird’s body into the air.

Do you have a favorite material that you like to use for your art work?

Why not leave a comment as to your thoughts on this piece. Please take a minute, fill it out the form by clicking on the “comments/no comments link” at the top of the posting, and then share your ideas with the rest of us. We all grow when we share our thoughts and impressions, so why not join our growing community of those who appreciate art quilts and textile arts. We’d love to hear from you!

You can see more of my art work on my web site at www.fiberfantasies.com
To find out how to buy my art work, please check out “How to Buy my Art Work” in the “Pages” section to the right of this blog.

“Going Around the Curves on an Art Quilt”

In a previous posting, I talked about how the wheel of spokes on this  fabric motif was the major design element common in a series of art quilts, “Circles of Black, Circles of White”. In this blog, I’m going to talk about how I cut the circles into arcs, and used them throughout the quilts. Many of the edges of the compositions seemed to call for half circles, as the background fabric was too bare to my eye. (Granted, my eye likes a LOT of embellishment!) In other places, the interior of the piece needed some accents, but not a full beaded circle. So, here are some photos of how I used the curves to accentuate the full circles.

Here is an example of the outer edge of the circle having been cut away from the wheel fabric motif seen above. It and the next photo are from the third in the series which was finished this year (2012). This arc was then cut into smaller pieces to make a bigger curve and the middle of the circle was beaded separately.(You can see that smaller black and white circle to the left of the green rimmed button and above the butterfly. It used to be in the middle of the big circle.) I used small orange buttons sewn on with contrasting aqua embroidery floss to draw the eye around the striped curve. That orange picked up the commercial orange organdy flower in the upper right of this pic, and the orange button in the lower left. I like to repeat colors in different sizes, shapes, and textures.

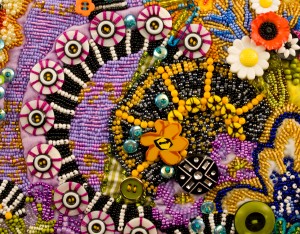
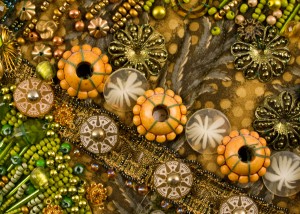
Here is another detail shot of this same third piece in this series of art quilts. The outer edge of the striped arc has been accentuated with those white shell rings that I’ve written about before. Here, they’re stitched down with a dark magenta embroidery floss. The centers have been filled in with those little black and white buttons that I order from Hong Kong. Their middles were stitched with yellow thread to pick up the color of the nearby larger beads and the asymmetrical flower button in the center of this photo. The interior of where the rest of the fabric circle would have been, has been beaded in with the shades of lavender and gold seed beads that were used in the background. (Those small size 10 seed beads are what make these quilts so long to finish as 1 sq. in or 2.5 cm sq. of that size bead takes 1 hour’s work.)

This photo is from the sixth in the series and was actually completed before the third above. (The quilts are named for the order in which they were cut out, but they were completed as I felt they would fit into various exhibition schedules.) Here is another example of where the smaller middle circle was cut away and surrounded by the larger, outer curve of the fabric motif, and the space in between was filled in with seed beads to match the background. Here, the same white shell rings have been attached with red embroidery floss, but the centers have been filled in with gold miracle beads. I love their luminous glow from the layers of coloring material in those beads. Their shine is quite shiny, and I add them on to surfaces whenever I can.

In this last example from the sixth art quilt, you can see how most of the main circle was used in the center of the photo, and then accentuated by a band of that striped arc. On the curve, the small black and white buttons have been replaced by red and white versions, and small red and gold buttons go around the center of the big circle. The gold dots in those central buttons pick up the gold seed beads sewn around the grommet holes in the brocade ribbon the left and the gold beads and flat rondelles on the white industrial zipper on the right of the photo.

No detail is too small for me to take advantage of as I compose my pieces as I repeat colors and shapes down to the smallest elements. Most people’s eyes naturally follow a curve, and so I’ve added things of interest at the ends to give their eyes something to focus on and pause before moving on tot he next feature. I hope that you can see how much fun I have making these art quilts, and can appreciate the love that I put into them.

Why not leave a comment as to your thoughts on this piece. Please take a minute, fill it out the form, and then share your ideas with the rest of us. We all grow when we share our thoughts and impressions, so why not join our growing community of those who appreciate art quilts and textile arts. We’d love to hear from you!

You can see more of my art work on my web site at www.fiberfantasies.com
To find out how to buy my art work, please check out “How to Buy my Art Work” in the “Pages” section to the right of this blog.