Tag Archive for button and bead embellishments

Lace is the Place

Lace is such an intricate fabric with a complicated structure. Originally, it was limited to ecclesiastical vestments and clothing for royalty because of the labor involved in its construction. Now, with much of it being made on machines, it is much more readily available for fiber artists to use in their work. For my art quilts, there are a number of lace pieces that I’ve used over the years.
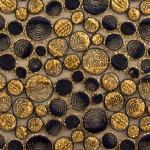
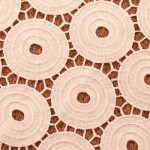
Lace that simulates grape clustersLace circles used for clouds and filler circles on art quiltsHere are two examples of very different types of lace. The gold and navy version on the left may have originally been meant to be pebbles, but I’ve used it as grape clusters a number of times. It does need to be used against a plain, contrasting background, as the threads that make up the circles are thin, and would be lost against a print base fabric. In contrast, the white circles on the right are a much heavier weight thread. By carefully cutting away the connecting links between the circles, I have used them as clouds many times. Since my work has a lot of circles in the design elements, such as buttons,beads, and other acquisitions, I also sometimes slip one of these white circles partially behind another motif that doesn’t have enough contrast between itself and the fabric next to it. The white circle acts as a buffer between the two, creating a bridge between the other two motifs so that two similar colors or prints can be read as being separate from a distance.
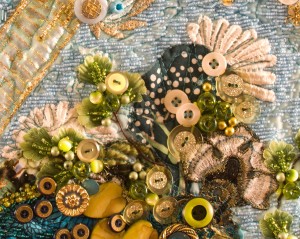
Lace fans as a design element in an art quiltPart of the fun for me in choosing embellishments for my art quilts is really looking at the shapes of my materials and using them in different ways. The white lace finger projections sticking out from behind motifs in this detail shot were originally petals from a lace flower design. However, I felt they could be re-used as clouds in this composition, especially since the nearby green leaves, pulled from a silk flower fern, had similarly shaped lobed edges. They both serve to give a subtle, soft dreamy quality to the overall look of this art quilt.

Lace embellished with sequins used in an art quiltIn the middle left of this detail shot is a heavily sequined flower motif cut from some very expensive lace. For me, I felt it would make great, shiny clouds, so that was how iI used it. When I’m buying lace fabric, I’m looking for yardage that has individual motifs that are separate from each other and can be easily cut away from the rest. I then count how many motifs / yd or m and then figure out a cost/unit. If it comes out at around $1-2 US, then I go for the expenditure. In this photo, you can also see some of the white lace circles that were mentioned at the beginning of the article. Here, I wanted the white circle at the bottom middle to make a plain, flat transition from the ornate sequined surface to the flatter appearing, gold lame around it.
Blue lace drop motif filled in with seed beads in an art quiltThe photo on the left is almost life size and I draw your attention to the blue filigree that takes up most of the central area. Those blue lines are the thick threads in a length of lace motifs. Sometimes, lace, instead of being sold as yardage, is created as lengths of individual motifs so that you can add a row on clothing. This particular lace was made of lengths of wide “rain drop” shapes about 2.5″W (6.5 cm) X 3.5″ T (9 cm). The spaces in between were wide enough to fill in with various lengths of size 10 seed beads, ranging from 2-6 beads in length. I quickly tired of filling in all the spaces, but persevered, and love the subtle texture differences between the lace threads and the glass beads.

Heavily edged lace fabric motifs for use in an art quiltHere is another lace fabric with the heavily edged motifs that I like to use as there is enough space in the ground fabric that I can separate the individual pieces and use them where I want. Below is a detail of one of these motifs used in an undersea scene.

Heavily edged lace fabric motif used in an art quilt

For me, the motif used in this context, has the feel of fan coral, or perhaps wide sea weed fronds waving in the currents. While I’m not sure there are blue seaweeds, (I know there is blue-green algae), as an artist, you get to pick the colors of how you want to depict your worlds. For me, that’s half the fun of what I create, as the scenes can be “real”, from my imagination, or a combination of both. How cool is that to be able to create your worlds the way that you would like to see them?

While lace can often be expensive, I feel that many of them are worth the money because of the elegant feel and textures they can provide to an art quilt’s surface that is hard to obtain with other materials. Texture is a very important part of why I use fabric, buttons, and beads for my embellishments. Lace is probably one of the easiest materials to employ if you’re looking for a soft look in you images. I invite you to splurge on some and have a blast seeing how many ways you can employ that material. Creating art is all about having fun, right?

Have you ever used a “luxury” material in your art work?

What were some of your successes and “learning experiences”?

Why not leave a comment as to your thoughts on this posting. Please take a minute, fill out the form by clicking on the “comments/no comments link” at the top of the posting, and then share your ideas with the rest of us. We all grow when we share our thoughts and impressions, so why not join our growing community of those who appreciate art quilts and textile arts. We’d love to hear from you!

You can see more of my art work on my web site at www.fiberfantasies.com

The series continues – “Circles of Black, Circles of White 3”

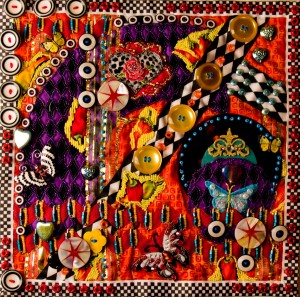
Art quilt - "Circles of Black, Circles of White 3" embellished with buttons and beads,This piece, “Circles of Black, Circles of White 3” ( 23”W x 28.75”T or 58.5 cm x 73 cm) is one of the prettiest art quilts that I’ve done. While I love all of my “children”, this piece just flowed through me and was easily constructed. While there are a diverse assortment of materials sewn onto its surface, to my eye at least, they balance out. When I’m creating a piece, I “hum” the various motifs and embellishments into place to a 4/4 beat. Each element is placed one piece at a time, as if that were the only one that was going to be included on the surface. After that piece is in place, I make another decision, and then another. So what you see in any of my pieces is the result of thousands of individual decisions with regard as to where something will end up and how it relates to what is already there. Most of these decisions are unconscious when I’m in what I call the “Creative Free Flow”. That State of Being is where I’m one and the same with whatever creative endeavor I’m working on, whether it’s my art work, or garden compositions, and time, in effect stands still as I commune with what is in front of me.

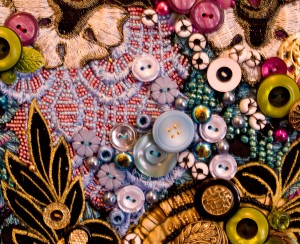
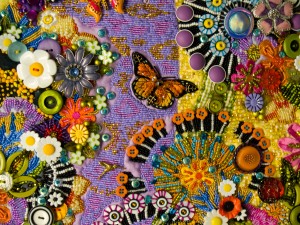
Detail of art quilt "Circles of Black, Circles of White 3" embellished with buttons and beads This detail shot has a lot of the elements that I frequently use. There is a monarch butterfly, commercial iron-on applique that is easily obtainable in many craft stores. To its left, is a lavender grey flower that is a recycled piece of costume jewelry. I love using old jewelry, which if it has a pin back, I’ll pin it through all 3 layers of the quilt, and then secure the end posts of that backing with lots of stitches so that the brooch won’t fall off. There are two of my favorite glass buttons visible, a shiny blue one near the top right, and an unusual one in the lower right. The back of the button is painted an opaque orange which is refracted through the clear glass layers above it, and the rim is painted with and opaque purple color. There is a circle of small blue safety pins in the lower right that have been threaded with large yellow beads and sewn into place. No detail is too small to consider, as the semi-circle of small orange buttons at the ends of the black and white bars that take up most of the bottom right of this photo, have been sewn on with aqua embroidery floss to pick up the same color in other nearby elements, such as beads and buttons.

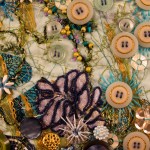
Detail of art quilt "Circles of Black, Circles of White 3" embellished with buttons and beadsThis detail photo was taken further back from the surface of the piece than the previous photo so you can see how more of the elements fit together. In the very center, is my signature hummingbird button that I include in all of my pieces. At the bottom middle is a semi-circle of those white shell circles, that I frequently use, here shown in their natural color. (There are many available in the craft stores that have been dyed various colors.) These were secured down with magenta embroidery floss to pick up some other similarly colored elements. I find that when I want to make a big impact with thread, there’s nothing like the variety of colors, the quality, and the availability of DMC embroidery floss. The 6 strands of thread, are sometimes difficult to thread into a large enough needle that also has a sharp point to pierce all 3 layers of the quilt. However, DMC threads are not intertwined, which allows them to lay flat when stitched down and thus, show up better.

Each of the pieces in this series, while having the black and white striped fabric circles in common, have their own distinct quality. Just as children in the same family have different personalities, so do each of the pieces in this series. Hopefully, one day, they’ll all be exhibited in the same show, which would be interesting to see how one led to the next, what new changes were made, and how they work as a whole body of artwork. I think that the Monet’s gallery at Giverny where his waterlily series is housed would be a great place to showcase these, but then I like to think big.

 Have you done a series and what did you learn from the experience?

Why not tell us about your insights on series, or leave a comment as to your thoughts on this posting. Please take a minute, fill out the form by clicking on the “comments/no comments link” at the top of the posting, and then share your ideas with the rest of us. We all grow when we share our thoughts and impressions, so why not join our growing community of those who appreciate art quilts and textile arts. We’d love to hear from you!

You can see more of my art work on my web site at www.fiberfantasies.com
To find out how to buy my art work, please check out “How to Buy my Art Work” in the “Pages” section to the right of this blog.

Ultimate Easter Eggs -1

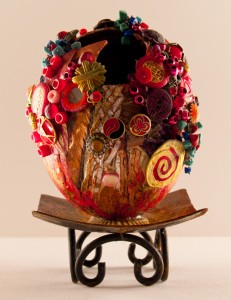
Ostrich egg embellished with buttons and beadsThis posting today is about some of my other artistic pursuits besides art quilts. I loved to decorate Easter eggs as a child. There was especially something magical about drawing a design on the egg with a clear crayon and watching as those areas did not take the dye. So my first introduction to wax resist, batik like dyeing methods was with colored dye tablets and smelly vinegar.

Later in life, I dated a man for a short time who was importing ostrich eggs from Ghana as a way to set up cottage industries there. He wanted me to decorate some of the eggs as a prototype for designs that could be replicated in Africa. The relationship quickly fell apart, and since I was no longer under any constraints to make something replicable for people in Africa, my fascination with ostrich eggs began.

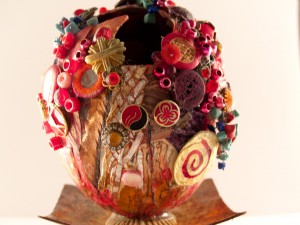
View 2 - Ostrich egg embellished with buttons and beads - "Baroque Egg"There’s something fun about having such a large “canvas” to work on compared to regular sized hen eggs. Here is another view of my first attempt – “Baroque Egg”. It sits in a large, metal spoked basket decorated with dragonflies. The surface of the egg was painted with gold paint, and then multiple layers of gel medium was painted on to decorate the surface and to attach the feathers and other ephemera that I added to the surface. The yellow, ringed circle with a red diagonal line through it in the bottom and middle right of the upper picture and the lower right of the second pic were cut from an old silk tie. (I find my materials where I can and whatever amuses me.)

It takes about a day for each layer of the gilded paint and gel medium to dry, but when I was pleased with the surface, I then began with embellishing the surface with buttons and beads. Any with shanks had to have them cut off, and some had to have the remaining protrusions filed away to make them flat enough on the back to glue on. I used E-6000 glue, which is readily available in hobby and craft stores. While smelly, it does a great job of securely fastening on the embellishments.

" Volcano egg" - an ostrich egg embellished with buttons and beads“Volcano Egg” is so named because of the broken crack in the upper part of the egg. Even when eggs are ordered from an ostrich company here in the States, they don’t pack them well, and as much as a third will arrive broken and cracked. This one, with the jagged protrusion from one side looked to me as if something had erupted from the inside, breaking free, just like a volcano. There is a strip of silvery, woven ribbon coming out of the opening. Red buttons and gold buttons to suggest lava on all the sides. Most of these additions are encrusted around the opening, as if they had cooled before flowing down to the bottom of the egg. This egg was glued at the base of a metal candle holder. Since this egg sits on a table near a fountain, the moisture in the air has given the metal base a lovely rusty patina that I couldn’t have planned on.

Detail of " Volcano egg" - an ostrich egg embellished with buttons and beadsThis second pic shows a slightly closer view of the egg and the deep dark recess of the inner hole inside. That hole is lined with lots of shiny red and gold buttons and beads, but you would have to look inside to see the encrusted surface. It was with a great deal of difficulty, using long forceps that are used for placing plants in terrariums, that I was able to glue the embellishments where I wanted them. Sometimes, that meant sitting there, with forceps in hand, holding the bead in place until the glue had dried enough to make sure that it would stay.  I like to think of this egg as if it’s a bird made geode, where you won’t see all of its beauty until you look inside.

Here in the Baltimore, MD – USA area, there’s a tradition of playing “crackies” with your dyed Easter eggs. Children would take an egg and tap against an opponent’s egg, hoping that the other one would crack. I think that the winner got some of the candy from the opponent’s Easter basket. I imagine that with factory raised eggs today, that would be very hard to play, as the shells tend to be much thinner now than long ago. However, anybody that used an ostrich egg would be sure to be a winner, as the shells are about .25″ or 3mm thick. However, having spent all the time decorating these eggs, I know that I’ll never play “crackies” with them.

Do you have any experiences with decorating eggs or a similar medium that’s not one of the usual materials ?

Why not leave a comment as to your thoughts on this posting. Please take a minute, fill out the form by clicking on the “comments/no comments link” at the top of the posting, and then share your ideas with the rest of us. We all grow when we share our thoughts and impressions, so why not join our growing community of those who appreciate art quilts and textile arts. We’d love to hear from you!

You can see more of my art work on my web site at www.fiberfantasies.com

To find out how to buy my art work, please check out “How to Buy my Art Work” in the “Pages” section to the right of this blog.

“Hearts, Peppers, and Butterflies”

Full shot of contemporary, beaded art quilt "Hearts, Peppers, and Butterflies"

Right before Thanksgiving, 2011, I went back to Matthews,NC, USA, for the 43rd anniversary of my graduation from Junior High. I have not been in touch with many of my high school friends, so have only attended a few of their reunions. However the idea of a junior high reunion seemed like fun, as our class ended up being split between two high schools. One woman with whom I had talked to over the years, Janet Deason Saunders, was sponsoring our class’s attendance, so I went to support her and see other old friends.

When I got there, fortunately, everybody had on name tags with very big letters, as we had changed quite a bit over the years. One person with whom I was quite pleased to see was my fourth grade boyfriend. I remember that he used to carry my books and walk me out to the bus every afternoon. (These were the same buses to which we practiced evacuation drills, as this was the scary time of the Cuban missile crisis). Anyway, he and I struck up a phone and email connection, and I decided to make him this small piece of wall art, (13″ x 13″; 33cm x 33cm) as a Christmas present.

He now lives in New Orleans, the home of the Delta Blues and the famous New Orleans Jazz Festival.  Since that town is one of my favorite cities here in the States, the images for this piece were easy to compile…. chili peppers, records and a few hearts thrown in as impending possibilities.

Detail of small beaded art quilt - "Hearts, Peppers, and Butterflies"

To use the concept of chili peppers,which is so popular in Cajun food, I was able to find some fabric on the Net at www.equilter.com, one of the best on-line textile stores there is. I scattered the cut out vegetables around the surface of the quilt, and established a shape around them with size 10 yellow seed beads so that they would stand out from the background. There’s a large, white mother of pearl button with a red star burst inlaid in it from the late 50s in the upper right of the photo on the left. Between it and the chili pepper, you can see one of my signature hummingbird buttons. I was just able to score some more of them on the Net. The original intent back in 2009, was that I thought I had bought a lifetime supply of them, but I’ve been more productive than I thought I was going to be, so I hustled and found some more.

Detail of small, beaded art quilt - "Hearts, Peppers, and Butterflies"

On the right in this photo, is a find that I am quite proud of. While very few people listen to their music on vinyl records anymore, I found a mobile in a party decorations store of 45s made out of thick plastic. They were made to look like Rock and Roll records but since New Orleans is more about jazz and the blues, I found a tiara-like, iron-on applique to cover up the words of the song title. I thought this especially fitting as New Orleans is sometimes known as the “Crescent City” and now the tiara motif is backed by a teal colored curve. At the bottom of the piece are two rows of wide rick-rack (about 1″ or 2.5cm wide). Scattered along their undulating waves are tiny gold safety pins with 3 large teal, hex shaped beads. They add an interesting texture and their color picks up some of the blue in the butterfly wings, the record label and the blue beads I sewed along the record’s edge. I do know that if I ever use those plastic records in another piece, I’m going to sew them on my machine. Doing them by hand was really hard on my fingers.

Butterflies have always been a favorite insect of mine and I have scattered them liberally in my garden pieces for quite a while. I could spend my life flitting from flower to flower, but only if I get to decorate the garden!. As for the hearts in the piece, they’re a tribute to young infatuations at the age of nine and ten, and to possibilities that could have been.

So, who would have thought that attending a junior high reunion after not seeing most of the people for over 40 years would lead to creating a piece of art.Life does make for some strange twists and turns, but often leads back to early inclinations and what we believed in when we were little. What formed us in our youth often inspires us in our future.

Where do you find the inspirations for your work?

Why not leave a comment as to your thoughts on this piece. Please take a minute, fill out the form by clicking on the “comments/no comments link” at the top of the posting, and then share your ideas with the rest of us. We all grow when we share our thoughts and impressions, so why not join our growing community of those who appreciate art quilts and textile arts. We’d love to hear from you!

You can see more of my art work on my web site at www.fiberfantasies.com
To find out how to buy my art work, please check out “How to Buy my Art Work” in the “Pages” section to the right of this blog.

Work in Progress (3) – Adding on the Buttons

In this fourth blog on constructing an art quilt,(#2 was divided into two posts) you can see that I’ve progressed to the point of adding on the buttons and some of the larger beads. For me, this can be quite an exciting time, as I make my choices from the wealth of treasures I have in the plastic shoe boxes surrounding the chair in front of the TV where I sew. This phase is more about narrowing down what is sewn on the quilt surface, as I usually have enough embellishments that I’ve pulled from my studio to make several quilts. Shades and subtle variations are important to me, at this point, so not just any blue will do to partner with the blues in the wings of the butterfly appliques that I have chosen. Just the right shade of contrasting embroidery floss is needed to sew the shank-less buttons on so that there will be a small splash of color on the surface of many of the flat buttons. I probably labor over details like that way more than I need to, but those countless little touches are what people frequently comment on, so i continue to be a bit obsessive about the colors and textures that I choose.

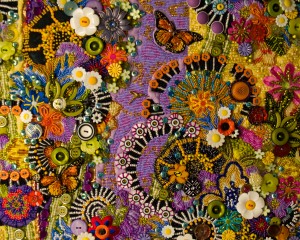
This 7th piece in the series, “Circles of Black. Circles of White” is dedicated to one of my favorite insects, butterflies. To honor them, I chose a wide range of iron-on appliques, pins, and printed fabric motifs of these delightful creatures. I happened to have a large number of blue “flutterbys”, and since yellow and blue are complementary colors on the color wheel, I was pleased with how they worked out in this composition. As i work, I move each new addition that is being considered around on the surface, searching for the ideal location, until intuitively, that piece feels “right” and balanced for me with what is already there. Each decision is made one at a time, so I’ll place 5-6 buttons of the same kind at different places on the surface, sew them down, each in turn, and then go on to the next style or color of button. Some nights, it’s the yellow button night, while other times, I work just with gold ones. Throughout this series, black and white buttons were used a lot, which should be no surprise, given the title of the sries.

The background fabric for this quilt has a yellow background with irregular blocks bounded in dark orange. To play off of this design element, I sewed vertical lines of small orange buttons attached with red thread. While the thread is not the same color as the background, against the orange buttons, its color seems to blend. I like using woven ribbons as vertical stripes, so these harlequin black and white ribbons play off the striped circles. You can see another repeat by the use of blue in the flat buttons in the middle and lower left harmonizing with the blue in the various butterfly wings. In this photo, you can also see how the black and white circle buttons repeat the same shape and color as the big, black and white fabric circles.

In this last photo, you can see how the piece has progressed after a few nights of sewing, The yellow discs in the meddle of the piece were originally sewn on with red sewing thread. Not being particularly subtle myself, I decided that I wanted more “oomph:, so I went over the thread with thicker, red embroidery floss. The big black and white circle in the upper right now has some small orange buttons sewn near th edge, while yellow-orange pearls have been sewn on to the black circle next to that big one of which I just wrote. Some of the background has started to be filled in with dark orange beads going around the edge of yellow, irregular squares. Eventually, a large portion of the surface will be covered with seed beads, just as in my other quilts.

Now begins the “Time of the Long Sew”, meaning that not much will appear to change very quickly. With most of the large buttons and beads in place, the seed beads begin to be sewn on, and 1 sq. in, or 2.5 cm = 1 hour’s work. I’ll post detail shots as time goes on and there seems to be some area that has emerged that has changed significantly, so do keep checking in to see how this piece progresses. Meanwhile, I’m rather pleased to say that I now have enough photographs in the queue for two and a half month’s worth of blogs, as the ideas just seem to keep coming. Stay tuned!

 Why not leave a comment as to your thoughts on this piece. Please take a minute, fill it out the form, and then share your ideas with the rest of us. We all grow when we share our thoughts and impressions, so why not join our growing community of those who appreciate art quilts and textile arts. We’d love to hear from you!

You can see more of my art work on my web site at www.fiberfantasies.com
To find out how to buy my art work, please check out “How to Buy my Art Work” in the “Pages” section to the right of this blog.