Tag Archive for art quilts embellished with buttons and beads

Iron-on Appliques for Embellishing Beaded Art Quilts – Part 1

Detail of an iron-on applique of a Monarch butterflyNancy Smeltzer, MFA

Several past postings have been about appliques of various forms that are meant for adding on to other surfaces, usually to clothing. While I normally sew mine on, there are a wider number of ones on the market that are meant to be ironed on. Here are some of the ones that I’ve purchased.

Butterflies are some of my favorite creatures and I use a lot of them in my work, since many of my beaded art quilts have garden themes. This Monarch butterfly applique is readily available in many craft stores. While they have glue on the back,meant to stick when heat is applied, I don’t trust them to stick permanently/ I always sew them on, even though the glue makes them quite stiff and hard to pierce with a sewing needle. For this butterfly, I used black leaf beads with white veins for the body of the insect and the tips of the upper wings. Shiny, square golden orange beads accent the sections of the wings, while a small gold button with a crystal center serves as the head.

iron-on butterfly appliquesHere are a number of other iron-on butterflies awaiting a home on some future art quilt. They range in sizes with the largest center one being about 3″ or 7.5 cm tall. They vary in the amount of detail that is shown, and the trick is to be careful not to use too many buttons and beads, no matter how small, so that some of the original colors and markings still show through. Fortunately, you can get a wide range of colors on-line for just about any color scheme, realistic images or not, that you might want to create. One difficulty in embellishing these lovelies, besides the difficulty of beading thorough the stiff material, is not covering up the antennae on the insects. Sometimes, it’s just best to hold  them down in place with a single stitch in order to secure them.

Hand beaded buttterflies
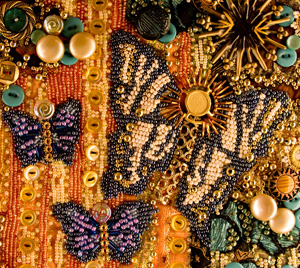
Of course, there’s always the option of beading a butterfly by hand, which I have done before. These three butterflies were hand beaded onto butterfly motifs cut from fabric. The largest in this shot, is about 3.5″ or 8.75 cm wide. With a large round button for the head, bugle beads radiate out to give a sunburst effect. Glass rondelles were used for the heads of the two smaller purple butterflies. Those have spacers from necklace strands for their bodies, while the larger butterfly has two links from an old bracelet for its body. All three have a great deal of details on them, which make for lots of impact in the composition. However, each of the smaller ones took about 2 hours to bead, compared to an hour to stitch down the Monarch iron-on with all of its beads, and the Monarch is more than twice the size of these smaller purple examples.

Iron-on dragon fly appliquesFinally, here are some iron-on dragon fly appliques waiting to find the right art quilt to decorate its surface. In nature, dragonflies are the dive bombers of the insect world, as they flit across the surfaces of water. They don’t have as large of a wing span, so they don’t make as much impact in an art quilt, but sometimes,it’s great to have more subtle details for a viewer to find upon close observation of the surface. I’d like to think as a viewer gets closer and closer to one of my pieces, that there would be more and more interesting details to see. Here’s where dragonfly appliques can serve their purpose in a garden scene. While fewer beads can be used, in order not to cover up the insect entirely, there is usually room for some of the larger size 6 and 3 seed beads on the outer edges of the wings.

Using a pre-formed applique can free up your time to add other embellishments. Also, I like to use at least five of the same element when I can, so these butterflies and dragonflies can give more instant gratification to the creation of s surface design than beading them by all by hand. Considering that some of my larger art quilts can take 4 months to complete, I’ll take what time saving available to me if I’m not sacrificing the visual appeal of the work.

How do you feel about using commercially made embellishments in your work? Where do you draw the line as to what you’ll include?

Why not leave a comment as to your thoughts on this posting. Please take a minute, fill out the form below or by clicking on the “comments/no comments link” at the top of the posting, and then share your ideas with the rest of us. We all grow when we share our thoughts and impressions, so why not join our growing community of those who appreciate art quilts and textile arts. We’d love to hear from you!… and PLEASE tell like minded souls about this blog! The more readers and contributors, the more I write because encouragement helps the words flow!

You can see more of my art work on my web site at www.fiberfantasies.com (be patient as it loads; it’s worth it), my spiritual healing work at www.transitionportals.com and can find me on Google + , Facebook (for Transition Portals) Facebook (for Fiber Fantasies),  and Twitter.

To find out how to buy my art work, please check out “How to Buy my Art Work” in the “Pages” section to the right of this blog.

Appliques in Use in my Beaded Art Quilts

Detail of art quilt that uses a commercial appliqueNancy Smeltzer, MFA

In the past few blogs, I wrote about some of the commercial appliques that I have purchased in the past. I thought that you might like to see how some of them have been used in finished pieces. In the detail shot on the left, there’s a blue satin applique from China outlined in gold braid in the middle of the photo. There’s a beautiful satin cherry blossom in the center that plays off of pale pink buttons and beads that I sewed on the side. In the far left, there’s a shi-sha mirror outlined in gold thread that complements the gold braid on the applique. I love tying the various elements together in this way with similar colors and materials that look as if they were made to go on a particular piece.

pink satin square from ChinaFrom the same series of satin appliques which I bought when I was in Hong Kong, is this pink version. I believe that the central motif is of a phoenix, but it could be one of the beautiful Asian pheasants, while the dark spot in the center of the one of the tail feathers has a dark spot in the middle reminiscent of the eye in peacock feathers. In any case, it’s beautifully made, and could be interpreted on many levels. The scroll edging leaves a lot of possibilities for buttons and beads that could be attached near the outside to emphasize the beauty of the stitching. I even have some gold buttons with pierced fret work that will be perfect with this applique when I find the right home for this piece to land.

Detail of commercial applique doilyThis detail shot shows a white cotton doily that also came from Hong Kong. I used it in a piece called “Dinner for Three on the Banks of the Cabernet. Since the story of this piece is about a dinner party on the sides of a river made of wine, the trellis edging around this applique was perfect to mimic grape vines, I attached the burgundy circle in the middle to suggest a dinner plate and stitched in gold embroidery floss a fork and knife on the sides to complete the picnic concept. Lots of burgundy and rose colored ribbon and silk flowers appear nearby to play off the concept of the lovely shades that can appear in the same glass of a good Cabernet.

Heavily embroidered applique from IndiaAll of the above appliques are relatively small, averaging about 5″ or 13 cm across. This last photo is one of those finds that I bought at the time, not knowing what I would do with it, (Sort of the thrill of the hunt kind of experience). Measuring about 14″ or 35.5 cm square, it’s covered with sequins and intricate, raised embroidery. I imagine that is was originally designed to be part of a decorative pillow, However, it would be way too scratchy of me to put on a sofa, so my take is that it would need to be part of a wall,hanging. It’s so beautifully executed that it would be hard for me to sew anything on it, but I imagine I would quickly get over that hesitation once I started sewing gold buttons on it’s surface, with some spilling over the sides to visually anchor this applique into the composition of an art quilt.

I love collecting beautiful materials for use in future pieces whose images I have no idea what they’ll look like when I make the purchase. I have boxes and boxes full of lovely things that are just waiting to be included in the right piece. The trouble is that even though the boxes are clear. I often “forget” that there’s the perfect treasure waiting in a particular set of acquisitions. That’s when it’s a delightful surprise to rediscover some wonderful purchase that has been waiting to come to life on one of my pieces.

How do you keep track of all of your lovely treasures that are waiting to be part of one of your compositions. My memory doesn’t usually serve me well, so the best I can do is to label a box “beaded appliques” or “funky ribbon and trim”. How do you distinguish your finds from each other?

Why not leave a comment as to your thoughts on this posting. Please take a minute, fill out the form below or by clicking on the “comments/no comments link” at the top of the posting, and then share your ideas with the rest of us. We all grow when we share our thoughts and impressions, so why not join our growing community of those who appreciate art quilts and textile arts. We’d love to hear from you!… and PLEASE tell like minded souls about this blog! The more readers and contributors, the more I write because encouragement helps the words flow!

You can see more of my art work on my web site at www.fiberfantasies.com (be patient as it loads; it’s worth it), my spiritual healing work at www.transitionportals.com and can find me on Google + , Facebook (for Transition Portals) Facebook (for Fiber Fantasies),  and Twitter.

To find out how to buy my art work, please check out “How to Buy my Art Work” in the “Pages” section to the right of this blog.

“Milly’s Garden” – a Meditation Garden Art Quilt

A shot of "Milly's Garden", an art quilt embellished with buttons and beads based on an energy's fieldThis photo shows the beginning of another one of my Meditation Garden series of art quilts. It was designed as a present for my mother. Her favorite color is green, so I lavished lots of different subtle shades of that color throughout the composition. The central orb motif that I’ve used for the other pieces in this series, has an aqua border, so I backed that area with a metallic gold and turquoise lace. There are some pale teal lace feathers on either side of the central portal or window that allows access to all of the parts of this garden. There are three golden yellow plumerias that make a triangle on the edges of the composition. In the upper left and bottom middle of the photo are some green, dyed shell circles that I’ve used in a lot of my pieces, as the central hole balances out the solid nature of the round buttons that I use. This piece, as you see it in this photo, is very early on in the construction, so there still a number of pins in place, holding down areas of fabric to keep them flat. I try to do most of the initial stitching in the middle of the piece, and work my way out to the edges. The pins can then be undone and repositioned as needed to allow for the piece to stretch or shrink as needed as more and more sewing and beading takes place.

Fabric motifs and buttons that were considered for "MIlly's Garden" but not usedI have spoken in the past about how when I’m working on an art quilt, I slip into the Creative Free Flow or The Zone and the piece and I are one with each other. This State of Being is even more true with these Meditation Garden pieces, as I am tapping into the person’s energy field to create a unique visual image for that person in which to play and meditate. However, when I was looking around for fabrics with large flowers before actually starting this piece for my mother, these were some of the fabrics and buttons I bought. I love the morning glories and the two toned yellow and magenta button in the middle is actually made out of pressed sawdust. (I love the idea of recycling materials.) The lavender flower motif on the left I also thought would be perfect for this piece, None of these colors or materials ended up in the final piece. As I was cutting out the fabrics, which is what I always start with first, I was “told” what was needed, and none of these became part of this piece. (I do have a future commission in the works for which the morning glories will be perfect!)

Being an artist, no matter what medium you use, involves making changes. Some people would call them compromises, but I prefer to see them as the piece telling me how it wants to look. For me, I learned a long time ago, to quit fighting with the materials at hand and let them tell me how they want to be arranged. When I do that surrender, that’s when I get my best pieces.

Have you ever started out on a piece of art work and have it turn out to be completely different than from how you had originally thought it would be? How did you feel about the “changes” that were made. Do you see those adjustments as a natural evolution from how the piece was originally supposed to be in the first place?

Why not leave a comment as to your thoughts on this posting. Please take a minute, fill out the form below or by clicking on the “comments/no comments link” at the top of the posting, and then share your ideas with the rest of us. We all grow when we share our thoughts and impressions, so why not join our growing community of those who appreciate art quilts and textile arts. We’d love to hear from you!

You can see more of my art work on my web site at www.fiberfantasies.com (be patient as it loads; it’s worth it), my healing work at www.hearthealing.net and can find me on Google + , Facebook (for Transition Portals) Facebook (for Fiber Fantasies),  and Twitter.

To find out how to buy my art work, please check out “How to Buy my Art Work” in the “Pages” section to the right of this blog.

2012 Bead Dreams Competition – “Circles of Black, Circles of White 5”

Art quilt "Circles of Black, Circles of White 5"Bead and Button” magazine is the premier magazine in the USA that combines both of my favorite embellishment materials for my art quilts, namely, buttons and beads. Every year they have a competition called “Bead Dreams” and this quilt, “Circles of Black, Circles of White 5”, was juried into the 2012 competition under the category of “Objects or Accessories”. While most of what is included in the magazine are wonderful ways to make jewelry, I took a chance to see if one of my art quilts would make the competition, and hurray! It got in….yeah me!

This particular art quilt, “Circles of Black, Circles of White 5” (24.25”W x 27.25”T or 61.5cm W x 6 cm T) is so named because it was the 5th in the series to be cut out. Since the fabric motifs define the look of the piece, and what was created before influences what comes afterwards, that’s why they’re numbered the way they are. However, some pieces beg to be finished before others, or I get caught up in a certain color combination, so this piece was the second in the series to actually be finished.

Detail of art quilt, "Circles of Black, Circles of White 5" embellished with buttons and beadsIn this detail shot, you can see some of the black and white circles and half circles that were used throughout the series. In the very center, you can see some of the orange and yellow glass tubes that I love sewn onto a semi circle that remind me of candy corn from Halloween. I also included my favorite animal symbols, butterflies, embellished with Swarovski crystals. While more expensive than similar crystal elements on the market, these Austrian beads have precise faceting which gives them a flash that is very hard to find in other offerings. In the lower right, is a glass button from Czechoslovakia. It’s clear purple glass contrasts with the opaque black parts on the back, so that to me, it resembles a dark version of a rose window in a medieval cathedral.

Detail of art quilt, "Circles of Black, Circles of White 5" embellished with buttons and beadsDown the center of this detail shot and off to the right are some circles cut out of shells that have been dyed green. In the centers, which have large holes, I sewed magenta beads that pick up the colors of the magenta flower in the middle of the photo. I use quite a diverse assortment of materials for the surfaces of my art quilts, so I like to repeat colors and shapes in various sizes to tie the composition together. Basically, if it has a hole in it or I can make one without breaking it, then the object is fair game for including for embellishments. I don’t like to use glue unless I absolutely have to, as over time, I’m worried about the chemicals in it leaching out into the fabric.

It’s sometimes hard for my work to be accepted into some art exhibits. With all of the buttons and beads, sometimes as much as 25 pounds or 10 kg., is it jewelry or is it an art quilt seems to be the confusing question for jurors. When the Art Barn in Athens, Ohio, USA used to have an exhibit “Beads” that alternated years with the prestigious “Quilt National”, I always got in those bead  shows. I have gotten better at choosing the exhibits to which I submit by looking at previous year’s entries, so I get turned down less than when I first started exhibiting over thirty years ago. I have searched the Net, and while there are a lot of other quilters and textile artists who use buttons and beads as embellishments, I am probably the most obsessive as far as sheer coverage of surface area, so I’m pleased that more and more of my work is getting recognition.

I just love the color choices that I made in this piece. Its very different from many of my other art quilts and a much bolder look than I usually do. Some have likened it to a Hispanic festival or a Mardi Gras parade. All I know is that it makes me smile when I look at it.

 What are some of your favorite materials that you like to collect?

Why not tell is about them or leave a comment as to your thoughts on this posting. Please take a minute, fill out the form by clicking on the “comments/no comments link” at the top of the posting, and then share your ideas with the rest of us. We all grow when we share our thoughts and impressions, so why not join our growing community of those who appreciate art quilts and textile arts.

We’d love to hear from you!

You can see more of my art work on my web site at www.fiberfantasies.com

To find out how to buy my art work, please check out “How to Buy my Art Work” in the “Pages” section to the right of this blog.

Experiment with Free Motion Machine Embroidery

"Bars and Stars 1" - Free Machine EmbroideryI usually like to do my art quilts by hand, as that makes them portable, and allows me to take them with me when I travel. However, I am recently working on smaller, more affordable pieces for people who like the look of my style but don’t want to invvest yet in one of my more intricate pieces.. To accomplish this goal, I brought out my sewing machine. I have a Bernina 1630 that I bought over fifteen years ago and just love. It has a number of pre-programmed stitches built into its inner computer system, but for the most part, I’ve used it to sew seams. I decided to see what could be done with some free motion work (as opposed to stylized motifs programmed into embroidery sewing machines.)In that style of sewing, you drop the feed dogs that move the pieces of fabric thorugh the machine at the same rate. You can then use the needle as you would a pencil or pen, except that the fabric gets moved around, instead of your hand, to make the marks. I used as a reference a marvelous book, Freestyle Machine Embroidery, by Carol Shinn. Her clear descriptions and marvelous photographs of her intricately stitched work are truly inspiring and of course, I wanted mine to look as richly textured as hers.

Detail of free machine embroidery - "Stars and Bars 1"In this detail piece of my first effort, “Stars and Bars 1”, the ribbon “bars” are tacked down with horizontal stripes of various colored lines, and the centers of the black circles have black stitched lines going around inside of them. I spent about 4-5 hours, attaching the fabric pieces, and embellishing them with “drawn” lines of thread. However, when it came to finishing the look of the piece, I fell back to what I know best, namely sewing on buttons and beads by hand. Those additions added another 8 hours of work to the completition. I love the look of the finished piece, but unfortunately, a lot of the machine embroidery in this first effort came to be covered up.

Free motion machine embroidery with hand beading - "Stars and Bars 2"In this second piece, “Stars and Bars 2”, I used the same “bar” ribbon but a different black and white ribbon. In this full view, you can a little more of the free motion, horizontal stitches in the white areas near the top of the photo. To accomplish this free motion ability, you need to drop the feed dogs, and use a darning foot so you can move the fabric easily to where you want. With some practice, I got the tensions between the upper and lower threads in the bottom even, so that there were no  big wads of thread either on the front or back. I was a little less obsessive with the buttons and beads, so there is more of the machine stitching visible. I remembered to use a 40 weight machine embroidery thread on this piece. While thicker in nature, so the stitching makes a bigger statement, that type of thread is not strong enough to take the push and pull of seams in clothing.

Detail of free motion machine embroidery with hand beading - "Stars and Bars 2"In the detail photo on the left, you can see more of the thread “sketching” that I did with the needle. I also used more buttons (which take up more surface area) and fewer of the size 8 seed beads to cut down the production time (about four hours faster than the first piece). I still need to work on production techniques and probably make a limited series more like a production line in order to save time and make these pieces more economical. I do really appreciate artists like Ms. Shinn who have really perfected free motion machine embroidery to the heights that they have. Still, for a first effort in a long time, I’m pleased with my two pieces.

Have you done any machine embroidery? Do you have any suggestions for this beginner and others?

Why not leave a comment as to your thoughts on this posting. Please take a minute, fill out the form by clicking on the “comments/no comments link” at the top of the posting, and then share your ideas with the rest of us. We all grow when we share our thoughts and impressions, so why not join our growing community of those who appreciate art quilts and textile arts. We’d love to hear from you!

You can see more of my art work on my web site at www.fiberfantasies.com

To find out how to buy my art work, please check out “How to Buy my Art Work” in the “Pages” section to the right of this blog.