Tag Archive for art quilt creation techniques

“Shady Sadie” – Another Unfinished Object

Shady Sadie - an Unfinshed Art Quilt by NIna-Marie SayreNancy Smeltzer, MFA

Photos provided by the artist, Nina-Marie Sayre

When I put out a call recently for anyone who had photos of unfinished objects(UFOs), my new friend over the Internet, Nina-Marie Sayre was one of the first to send in photos and information. Her blog is well written and has a huge number of followers. On Friday’s she has a feature where you can post a blog that you’ve published the previous week, so my art quilting world is quickly expanding.

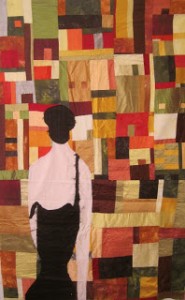
Her is a photo of the full view of “Shady Sadie”, one of Nina-Marie’s UFOs. She had quite a lots of comments on her own blog regarding suggestions from others as to how she could finish the piece. Many of the comments were about why the one extended arm was so long. Nina-Marie had started the piece at a quilt conference, and loves using women as subjects in her work. She’s “not above abstracting her (Sadie) either. I want the piece to have a little mystery and texture.” So there you are from the artist’s mouth; this woman is supposed to have a very long arm!
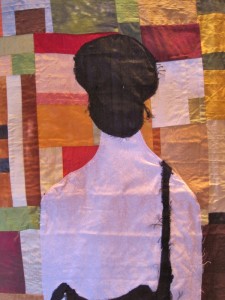
Detail of back of Sadie's headHere’s a close-up of Sadie’s back and head. One possibility that Nina-Marie proposed in an early correspondence with her was to tattoo Sadie’s back and add some embellishments. While I don’t personally have any tats, I’m all for embellishments of any kind, so that got my attention. An interesting tattoo could certainly add to the air of mystery that Nina-Marie said she was looking for.
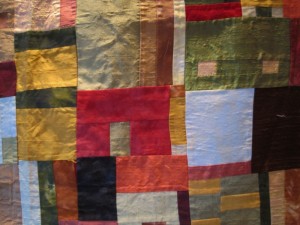
Block Detail of Background-  "Shady Sadie"In this background photo, you can see some of the fun that Nina-Marie had in composing the blocks that make up the majority of the quilt. She used silk backed with a thin fusible material so that it wouldn’t ravel. I said that she was brave to use silk, and Nina-Marie said it wasn’t too hard to use with the backing. When asked about her use of that exotic material for quilting, she did say that she only uses a little, as it’s expensive and it (silk) “seems to have only one level of saturation – a lot!”

Nina-Marie had some great advice when I asked for her suggestions as to what to do with UFOs. “Don’t be afraid to cut it apart.” (I’ve done that one before.) “Don’t settle for just ‘OK’ .” (I try not to do that one.) However, one of her final nuggets of advice was “Don’t be afraid to give away a UFO that you don’t have any intention of finishing.” O-O-Oh! I need to work on this one, as I could use some room in my studio.

 I’ve asked this before, but will ask again… how do you handle your UFOs? Also, I’m always looking for well-lit photos and information on your UFOs, so send them to me at info@fiberfantasies.com I’d love to feature you in an upcoming blog.

Why not leave a comment as to your thoughts on this posting. Please take a minute, fill out the form below or by clicking on the “comments/no comments link” at the top of the posting, and then share your ideas with the rest of us. We all grow when we share our thoughts and impressions, so why not join our growing community of those who appreciate art quilts and textile arts. We’d love to hear from you!… and PLEASE tell like minded souls about this blog! The more readers and contributors, the more I write because encouragement helps the words flow!

You can see more of my art work on my web site at www.fiberfantasies.com (be patient as it loads; it’s worth it), my spiritual healing work at www.transitionportals.com and can find me on Google + , Facebook (for Transition Portals) Facebook (for Fiber Fantasies),  and Twitter.

To find out how to buy my art work, please check out “How to Buy my Art Work” in the “Pages” section to the right of this blog.

Tidying up the Sides – Adding the Binding (2)

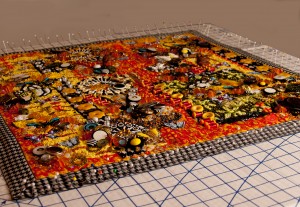
A contemprary art quilt being blocked on a pinning boardThis posting completes the information on how I finish off the edges of an art quilt and deal with the binding. Back when quilts were designed to be used as bed covers, the binding was essential in order to keep the edges from unraveling. Now, some sort of edging has just become the norm just as frames are on many paintings. In the photo on the left. the binding has been sewn all around the edges of the quilt, but not folded under and sewn in place on the back yet. At this point, I like to pin the whole piece into place on a cardboard pinning board, following the grid lines to keep the piece rectangular. I block it by misting it with water from a spray bottle and let the piece dry over night. Then, I remove all of the pins and fold the binding under to cover the raw edges and stitch it into place on the back. The pinning board that I’m use is a cardboard one that has grid lines on it that I buy in a sewing store. It’s 72″ or 183 cm long, so as a section gets warped from being sprayed after blocking five or six quilts, I cut off the distorted section and still have enough room for more quilts. I’m not so concerned at this point which of the grid lines that I’m pinning into as much as that I’m pinning into a squared off section of the board. I put in a pin at least every inch or 2.5 cm, but if the ribbon binding is thin, I may need to put in pins more frequently so that there aren’t little peaks along the edge. When the ribbon is tuned over, it may not be wide enough to cover the stitches that fastened down the binding on the front of the quilt. If that’s the case, I may need to stitch an additional ribbon flat on the back to cover up the stitches from the front.

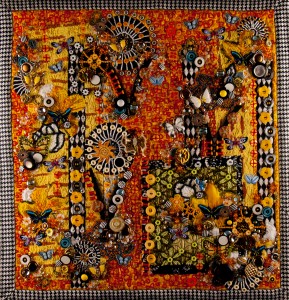
Contemporary, beaded art quilt "Circles of Black, Circles of White 7"Then, I add a 4″ or 10 cm wide sleeve on the top of the quilt for a hanging rod. As I was finishing this blog this morning, “Quilting Daily” had a brilliant posting about making one big long sleeve and cutting lengths as you need them. That makes so much sense, as there’s nothing more boring than making display sleeves for hanging a quilt. A signature patch is then sewn on the lower right of the back. It contains my name, the copyright ©, the year of completion, and the name of the piece.

As I said before, all of this finishing work is not particularly artistically rewarding, but is so necessary to give a quality finish to the piece. It is surprising how distracting to the eye being off as little as 1/2 ” or 1.75 cm can be and then the viewer spends a lot of time thinking”Wow! that quilt sure is crooked!”, rather than “Look at how amazing that quilt is!”. Somehow, I would like to think that the latter thoughts are being voiced after all of the work that I put in.

Have you ever finished an art project and realized that there was some mistake, such as a crooked edge? What did you do to “correct” it besides ripping it out or starting over? 

Why not leave a comment as to your thoughts on this posting. Please take a minute, fill out the form below or by clicking on the “comments/no comments link” at the top of the posting, and then share your ideas with the rest of us. We all grow when we share our thoughts and impressions, so why not join our growing community of those who appreciate art quilts and textile arts. We’d love to hear from you!

You can see more of my art work on my web site at www.fiberfantasies.com (be patient as it loads; it’s worth it) and can find me on Google + , Facebook,  and Twitter.

To find out how to buy my art work, please check out “How to Buy my Art Work” in the “Pages” section to the right of this blog.
Circles B&W 7 – An Art Quilt Continues on Towards Completion

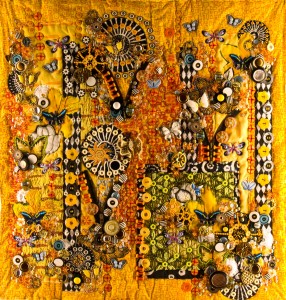
“Circles of Black, Circles of White 7” – an art quilt in progress

My art quilt, “Circles of Black, Circles of White 7” is continuing right along. I try and put in 4-5 hours every night beading on a piece, which quilts it at the same time. At this point in the construction process, I am pretty much down to finishing off with sewing on the seed beads. There just isn’t anymore room for the the wealth of buttons, appliques, and larger beads that are left in shoe boxes on the sofa beside my sewing chair. To avoid one big majot clean-up, I’m trying to return some pieces each night back to their homes in my studio. That way, I won’t be swamped with cleaning up all at once when I’m finished with a piece, and will be more encouraged to cut out another. There are, however, still two more quilts half finished in this series, so I won’t lack for things to sew on this upcoming year.

As with all of my art quilts, there are always surprises as I move through to completing them. On the far right edge of the above photo, you can see the much lighter yellow of the mottled background that is the backing for the surface of this piece. However, as you can see, the piece wanted to be darker as I worked on it. The irregular edges of the orange blocks in that main piece of yellow fabric became much darker as I stitched the outline in with seeds beads as close to the color as I could find. Filling them in with bright yellow beads only added to making what had started out as a subtle yellow background into more of an orange one. (See far bottom left of the detail photo below as to what the original fabric looked like before beading.) Oh well! That was that the quilt wanted.

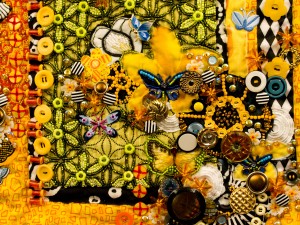
Detail of “Circles of Black, Circles of White 7” – art quilt in progress

In the detail pic to the left, that pale green square in the lower right of the overall composition also became darker as it was beaded. I left some of the original pale green fabric untouched (You can see it to the lower left of the central yellow flower in this photo..) I do like to leave some of the original fabric showing, so that people can get a sense of what was underneath all of that beading. You can also see in the lower right hand of this detail photo, as to why there’s not any more room for more buttons or larger embellishments, as it’s getting pretty crowded down there.

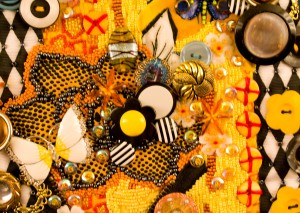
Detail of “Circles of Black, Circles of White 7” – art quilt in progress

In this detail photo, you can see one of the flower motifs that I chose for this quilt. It’s dark blue-black dotted print on a golden tan background. The fabric is a knit, which I don’t usually use, as it “crawls” all over the place as I try to cut it out. However, since the longest dimension is about 4″ (10 cm) across, and it was going to be heavily beaded into place anyway, I used it as its colors fit into what I was trying to accomplish with the overall composition.

The “Time of the Long Sew” continues, as there are many more hours left to be completed before this piece will be ready to trim and bind the edges. Most of the major color and composition decisions have been made, so it’s a matter now of filling in the areas with the extensive seed beading that I’m known for. I did find in Quilting Magazine’s on-line e-mag publication “In Stitches – Volume 6”, (you need to subscribe to this), a whole section of gloves and finger cots to save your hands. I think I’ll try out some of the ones that protect your fingers. I hate thimbles, and for me, the “Time of the Long Sew” translates as the “Time of the Raggedy Fingertips”!What trials and tribulations do you go through to create your work? Why not leave a comment as to your thoughts on this piece. Please take a minute, fill it out the form, and then share your ideas with the rest of us. We all grow when we share our thoughts and impressions, so why not join our growing community of those who appreciate art quilts and textile arts. We’d love to hear from you!You can see more of my art work on my web site at www.fiberfantasies.comTo find out how to buy my art work, please check out “How to Buy my Art Work” in the “Pages” section to the right of this blog.