Tag Archive for art quilt construction techniques

“Opulence-Warm Slate” – the Beginning of an Early Series

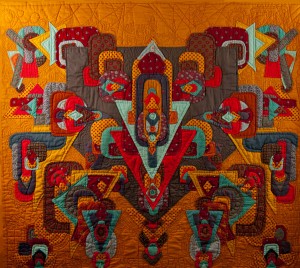
"Opulence - Warm Slate" - a hand appliqued and quilted art quiltAfter having taken a workshop with Nancy Crow in the early 80s, and receiving encouragement from her to keep on with my geometric series, I began with this quilt, “Opulence- Warm Slate”. I had no idea at the time what my later work would look like, and how embellished it would end up, but for me, I thought that the quilts in the series were pretty opulent, given the number of pieces that were hand appliqued in place. I also love contradictions in word phrases. The blue- grey slate color somehow was a given, but it ended up on a warm pumpkin orange background. If you’ve ever touched a piece of slate rock, it is anything but warm,as it tends to release heat pretty quickly, hence, for me. a quirky title for this piece was born.
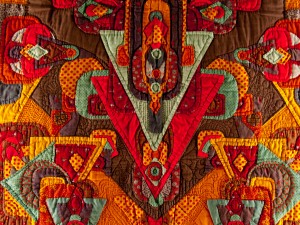
Detail of contemporary hand appliqued,hand quilted art quiltThis detail shot of the center of the piece shows some of the intricate hand applique and hand quilting that went into this piece. Measuring 41″ W x 37.25″T (104 cm W x 94.5 cm T), I had lots of room to create a symmetrical arrangement that still had lots of room for intricate additions. When I was doing this geometric series, I had a hardware tackle box filled with different sizes of shapes that I had cut out of clear acetate. I had these templates at the ready, and so when I could “see” that a certain area needed a circle, I could go through my collection to see what size I needed. Having clear templates also made it easy to position the plastic exactly over what part of the fabric that I wanted to cut out. I’d put the template into place, trace around it with a white or yellow colored pencil (depending on the color of the fabric, and then when I cut it out, I added an extra 1/4′ ( 7mm) of fabric for turning under when I sewed. So, if I wanted a rose to be in the center of a particular motif, I could see where to place the template for the cutting.
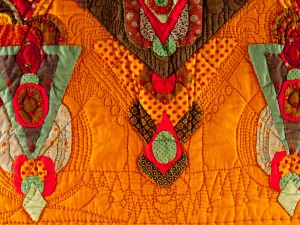
Detail of hand applique and hand quilting on a contemporary art quiltThe hand quilting that I spent hours on shows up in this detail shot. I used a contrasting thread, in this case, a dark orange red, because if I was going to do all of those little tiny stitches, I wanted them to show. I did use a quilting frame for a piece this large, but since when I bought it, I had no idea the size quilts I would be making, I purchased one with 6′ (2m) poles on to which to roll the quilt sandwich as the work progressed. Since I liked to watch TV as I quilted at night after teaching school all day, that frame took up quite a bit of room in the family room. (Another source of “discussions” with my ex!) I drew some of the quilting lines lightly in place with a pencil, but as the work progressed, would often have to go back and redraw the lines, as they would get rubbed off as my hands and arms moved across the surface. I was using some “echo quilting” in this piece, where lines are stitched parallel  or repeat around and round lines already stitched. It’s often used in Hawaiian quilting, where the quilting lines ripple outwards as if a pebble had been dropped in a pond.

The colors in this quilt pleased me, so it hung in my house for quite awhile. However, vertical wall space became a premium as the years went by, as I’ve lived in this house for over 30 years. As more and more quilts were created, this piece went into storage to await a retrospective of my work some day. However, I guess that this blog is a virtual exhibit of what I’ve done and where I’ve been in the wide world of art quilting.

How do you decide on the names and images for your quilts? Are you into quickly achieving a finished product or are you a “Fan of the Long Sew?”  

Why not leave a comment as to your thoughts on this posting. Please take a minute, fill out the form below or by clicking on the “comments/no comments link” at the top of the posting, and then share your ideas with the rest of us. We all grow when we share our thoughts and impressions, so why not join our growing community of those who appreciate art quilts and textile arts. We’d love to hear from you!… and PLEASE tell like minded souls about this blog! The more readers and contributors, the more I write.

You can see more of my art work on my web site at www.fiberfantasies.com (be patient as it loads; it’s worth it), my healing work at www.hearthealing.net and can find me on Google + , Facebook (for Transition Portals) Facebook (for Fiber Fantasies),  and Twitter.

To find out how to buy my art work, please check out “How to Buy my Art Work” in the “Pages” section to the right of this blog.

Seeing the Love in What I Make

The word "Love" in a contemporary beaded art quiltThis is a more cropped version of the full shot that I posted in the last blog of finishing up “Circles of Black, Circles of White 7”. Many of the comments about the blog on on my Facebook page were about being able to see the word “Love” in the section of the quilt shown on the left of the photo. The “L” is in the the harlequin ribbon on the left, the “O” is in the big circle in the Upper middle, the “V” is in the small, open industrial zipper in the middle, and the “E” (a bit of a stretch) is suggested on the right with more of the harlequin ribbon. I wish that I could claim that I had deliberately put that word into the composition, but it was not a conscious effort on my part…..but then in my healing practice, there are no coincidences.

I always find it amusing what other people see in my art work. I am often quite blind to what I’m creating, because I’m so caught up in the process. I’m cutting out shapes, pinning them into place, and then once satisfied with the look, begin with the larger textural elements, such as the bigger buttons, zippers, and metal buckles and stampings. I’ve often said that if it has a hole in it, or can have a hole put in it, then it’s fair game to put on the surface of one of my quilts. The only tiime that I view the quilt at a distance is when I’m pinning the cut-out fabric motifs into place. After that, I rarely see the work more than a foot away from my face, as I have the piece clamped to a small folding table as I sew on the beads. So the inclusion of the word “Love” was not intentional.

…or was it? As I was working on this art quilt, I began a relationship with my 10th grade boyfriend. Connecting back up after 46 years seems quite a bit of a story book tale, so as you can imagine, I’m a bit starry eyed. Who knows what magic was being worked under my fingers as all kinds of fantasies ran through my mind as I sewed. Since I do put a part of my heart and soul into each piece that I do, I think that my nest series will be about hiding the word “Love” into the design composition. Stay tuned to these pages as I start to work on that series.

How have you been surprised by what appears in your art work? What did you do to capitalize on that discovery and make it work for you?

Why not leave a comment as to your thoughts on this posting. Please take a minute, fill out the form below or by clicking on the “comments/no comments link” at the top of the posting, and then share your ideas with the rest of us. We all grow when we share our thoughts and impressions, so why not join our growing community of those who appreciate art quilts and textile arts. We’d love to hear from you!

You can see more of my art work on my web site at www.fiberfantasies.com (be patient as it loads; it’s worth it) and can find me on Google + , Facebook,  and Twitter.

To find out how to buy my art work, please check out “How to Buy my Art Work” in the “Pages” section to the right of this blog.
Tidying up the Sides – Adding the Binding (1)

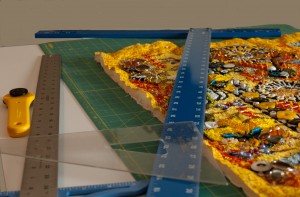
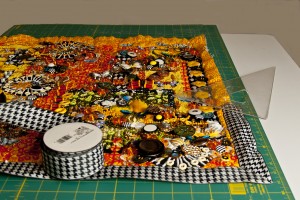
Trimming the edges of a contemporary beaded art quiltI suppose that it’s quite appropriate that this week, marking one year of posting on this blog, that I talk about finishing an art quilt. “Circle of Black, Circles of White 7″ is finally finished and ready to put the binding on. While this stage isn’t much fun, it is so critical that the opposite sides be the same length  and the corners be squared, as that’s will make the piece appear more professional when ti’s hung on the wall.

You can see on the side of the quilt the tools that I use to even up the edges before putting on the binding. On top of my fold out table that I use just for cutting, I have a green self-healing mat. There are many out on the market, but I like this version as it has grid marks printed on it. The Olfa rotary cutter is perfect for trimming off the little smidgens of fabric and batting that keep the sides from being even. The pieces that I do mostly now are approximately 3′ x 4′ or 91.5 cm x 122 cm. That size is small enough so that I don’t have to haul out a frame, as the embellishments can get to be pretty thick. The result of not using a frame, however, is that the pieces can get slightly distorted in the construction process, and so this final cutting to even the sides is really important.

I have two sizes of T-squares to use to run the rotary cutter against. The larger one is really heavy and measures about 48” or 122 cm tall of usable height. I bought it in the tools department at a local hardware store and it’s a much sturdier surface to cut against than the smaller one shown above that you get in the drawing supply section of an art store. Sometimes, the larger buttons have to be temporarily removed so that the rotary cutter can pass by them. They then are sewn back in place after the sides have been trimmed. The last piece of equipment you can see is a clear drafting triangle. That is invaluable for making sure that the corners are cut squarely and that the corners are folded neatly and evenly after the binding is put on.

Starting to put the binding on a contemporary beaded art quiltHere is a view of me starting to put the binding on the edge of the trimmed quilt. I used to make my own bias, but I find it so much easier to use a wide ribbon for that purpose. It needs to be at least 1.5″ or 3.75 cm wide and easily draped, so that it will turn the corners easily. That need for easy folding eliminates many of the heavier grosgrains that are out on the market. I try to keep the embellishments at least 3″ or 7.75 cm  from the edge of the quilt as I’m constructing it, because as the sides are being trimmed, it’s often surprising how much fabric is lost to even out the edges. Sometimes, the ribbon binding may cover up some of the small, size 10 and 11 seed beads, but if there’s a larger element, it may have to be removed. Hopefully, if it’s a larger button, the binding can fit under the edges and the button will just overlap out over the inner edge of the binding. Sometimes, when holding the quilt up at the end to check on the visual balance, I’ll sew buttons or larger elements out into the binding to make the piece appear more balanced to the eye.

I usually start sewing the binding up a little ways from the lower right hand corner. That way, the overlap of the rest of the binding doesn’t seem to show as much. When I get to a corner, I fold the ribbon at a 45 degree angle and start the binding heading off on the new side. I pin the binding in place along a whole side so that it will be even. Before I get too far sewing along a side, I check the corner with the drafting triangle to make sure the corner is even, before I’ve sewn too far along an edge and have to rip out the binding that I’ve sewn down. I find it’s better to measure as I go along, rather than have to take out stitches later.

Measure, measure, measure! It’s not particularly rewarding work, but crooked corners and sides that are supposed to be straight and aren’t can be so distracting. Many people can see discrepancies as small as 1/8″ or 3mm, and will spend all their time looking at them rather than the great work that you’ve done. I’ll detail out more information on finishing up an art quilt in my next posting.

What tricks of the trade have you learned about finishing an art quilt? What do you do to indure that the edges are even and the corners squared?

Why not leave a comment as to your thoughts on this posting. Please take a minute, fill out the form below or by clicking on the “comments/no comments link” at the top of the posting, and then share your ideas with the rest of us. We all grow when we share our thoughts and impressions, so why not join our growing community of those who appreciate art quilts and textile arts. We’d love to hear from you!

You can see more of my art work on my web site at www.fiberfantasies.com and can find me on Google + , Facebook,  and Twitter.

To find out how to buy my art work, please check out “How to Buy my Art Work” in the “Pages” section to the right of this blog.
Getting in Line with Bugle Beads

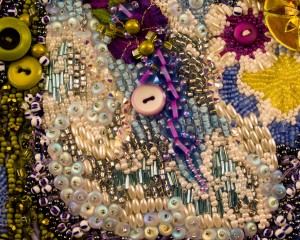
Detail of pale blue bugle beads used in the art quit, Japanese IrisesFor me, the term bugle beads seems to be a misnomer for these long bead tubes, but that seems to be how they are known. They go a long way towards creating lines in bead work, as seen in this detail shot on the left of the art quilt, “Japanese Irises” .I find them to be kind of like unidirectional crosshatching in etchings, in that they give another quality of lines to a piece. In this particular section of the flower petal, I also used elongated white pearls to achieve a similar effect. If you look at the yellow area in the upper right of this photo, while the yellow and medium blue round seed beads have also been sewn in lines, the effect is very different from the lines created by the bugle beads.

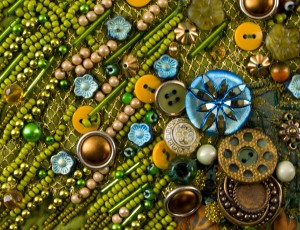
Green bugle beads used in the art quilt, "Elements - Earth"In this detail photo from the art quilt, “Elements – Earth”, green bugle beads are again laid down as lines as if on a lush forest floor. They offer a contrast to the round lines of green seed beads and draw the eye off to the right where there is a larger concentration of buttons to suggest mushrooms and other structures on a log or mossy stone. These long beads could also be interpreted as long blades of grass that have been flattened by a passerby’s footsteps making his way through the woods.

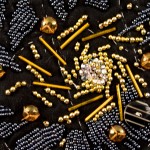
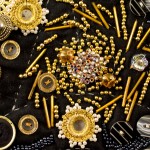
Gold bugle beads in the art quilt, "Fabric of the Universe"Gold bugle beads in the art quilt, "Fabric of the Universe"These two thumbnails are from the same art quilt, “Fabric of the Universe” . Both show different representations of small galaxies that swirl out there in the Universe. By using gold bugle beads, sewn at angles,the eye is directed outwards into the cloud of the spiral. Here again, lines of black and gold seed beads repeat the pattern of the lines made by the bugle beads and make for a much richer texture than using only one kind of bead would have done.

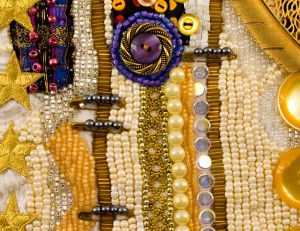
Vertical rows of gold bugle beads in the art quilt, "Feathers and Stars, Stars and Feathers"In the photo on the left from the art quilt, “Feathers and Stars, Stars and Feathers” , shorter bugle beads are used to make vertical lines that mimic the lines of larger round beads and trim used in the same area. These glass beads are emphasized with the short gold safety pins with 4 large beads on the shaft of the pin that are fastened across the vertical lines. One of the problems with using elements to make lines of any length is seen on the left hand column of gold bugle beads that wobble a bit in this detail shot. In the actual full art quilt, that inconsistency doesn’t show up as much as it does in this detail shot. However, lines that stray too far from a true 180 degrees are quickly picked up by a viewer’s eyes.

Bugle beads used on the edge treatment and the tassel of the art quilt, "The Moon Rises Over Thundercloud"Along the upper edge, on the right of this detail shot, you can see bugle beads sewn on vertically to line the edge of the art quilt, “The Moon Rises Over Thundercloud” . By doing so, the edge was made much thicker than is usually found in a quilt sandwich with its decorated top, middle batting, and backing fabric. In contrast, there are also a number of much longer bugle beads that are used to make the corner tassel and suggest the ethnic look I was striving for in this piece.

Lines are not usually an important design element in my work. Bugle beads are a terrific way to incorporate them into your art quilts. You do need to be careful about choosing ones that have smooth endings as some have broken edges that will cut the threads used to fasten them. Depending on where the beads will end up in the design, clear plastic sewing thread may be needed to sewn down the bugle beads to avoid this tearing. Some new kinds of bugles even have a delightful twist in them that gives another layer of subtle texture. Do make sure that the needle that you’re using will fit all the way through a majority of the beads before threading it, as bugles especially seem to be inconsistent with regard to the size of their central holes.

Do you use lines as an important design element? How have you achieved the use of them in your work?

Why not leave a comment as to your thoughts on this posting. Please take a minute, fill out the form by clicking on the “comments/no comments link” at the top of the posting, and then share your ideas with the rest of us. We all grow when we share our thoughts and impressions, so why not join our growing community of those who appreciate art quilts and textile arts. We’d love to hear from you!

You can see more of my art work on my web site at www.fiberfantasies.com

Gardens of Yellow & Butterflies – Another Work in Progress

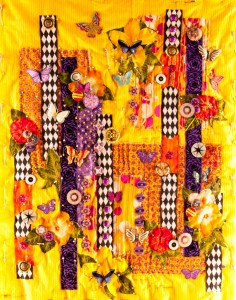
Full shot of an art quilt in progress - :Gardens of Yellow and Butterflies"I recently gave a presentation to a local Brandeis University Committee that supports the University and its libraries. I wanted to have a work in progress piece to show them how an art quilt is made, with its messy quilt sandwich, the untrimmed backing fabric,  and the middle batting sticking out. I also knew that I would be traveling soon, and that an art quilt the usual size of one of my larger pieces would take up a lot of room and weight in my carry on luggage. So the day before the presentation for the Brandeis group, I cut out this smaller art quilt (approx, 24″ W x 30″T, or 61 cm W x 76.5 cm T), “Gardens of Yellow and Butterflies” to demonstrate how an art quilt looks when it’s first being made.

The photo above shows this quilt, two days old, with the fabric pieces pinned into place. There are numerous safety pins up the middle and around the edges that keep the three layers from shifting too much as the sewing progresses. I like using safety pins rather then large basting stitches to hold the quilt sandwich together, as the safety pins can be opened and the fabric repositioned as is inevitably needed as I bead and quilt,as I don’t use a quilting frame. Rather, these pieces are sewn on a large sketching board that is clamped to a small, folding TV tray with quick release clamps from a hardware store. (Check this link to an earlier blog and scroll to the last pic to see the set-up.)

Detail of art quilt work in progress - "Gardens of Yellow and Butterflies"Here is a detail shot of the art quilt at that early stage of construction. You can see a vertical safety pin in the center yellow fabric as large areas of the same fabric tend to have bulges in them at this stage. There are the also visible white heads of lots of straight pins holding some of the pieces of fabric and ribbons in place. I love using ribbons, usually as  a vertical accent, but the black and white harlequin grosgrain ribbon stretching from the middle to the bottom right in this detail photo has already shifted. At this point, I’ve sewn some buttons and beads already onto the top of it, and rather than rip all of those out at this stage, I’ll use other elements as the piece progresses, such as sewing a large button on top of the ribbon near the bottom, to distract the eye from noticing that that ribbon is crooked.

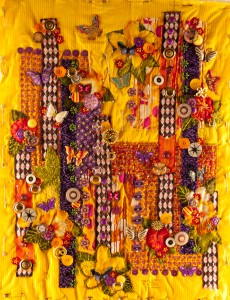
Full view of "Gardens of Yellow and Butterflies" - two weeks laterThis full view photo was taken two weeks later from the first full view above. A lot of the colored fabric shapes have settled into place, as the edges have either been sewn down, and the straight pins removed or they’ve been beaded down. The yellow background fabric, which is actually two different colors of thin yellow stripes, is still the most wrinkled, and will continue to be until that large area has been beaded down. I can see also that while the black and white ribbon in the middle, extending to the bottom’s crookedness has been disguised with buttons to distract the eye, the same longer ribbon on the far right needs something done to make its top appear straight. It is always amazing to me that what I see with my eyes looks fine, and I don’t see areas I that need fixing until I see a photograph of it.

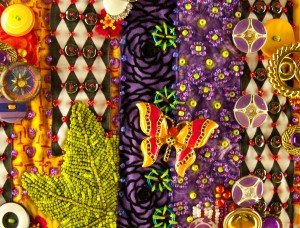
Detail of the art quilt - "Gardens of Yellow and Bitterflies", taken two weeks later from photos aboveThis later detail photo is taken from the same lower right corner as the detail shot above. The centers of the black diamond shapes in the black and white ribbon have now been filled in with hematite colored glass rondelles, held in place with a red seed bead. Larger sized red seed beads were sewn at the points where the black and white diamonds intersect. The green leaf is completely covered with different colors of beads, with 1 sq in or 2.5 sq cm equalling 1 hour’s work. The purple and black ribbon in the middle of this photo has purple seed beads sewn along the edges and at various places, there are aqua jump rings, sewn in place with lime green embroidery thread. This is because that ribbon has a wire edge, and while the edge will lie flat, the middle of the ribbon often doesn’t.

It has taken me over 30 years of being an art quilter to get command of most of the materials that I use. At this point, if I can think it, I can make it, so the actual construction techniques are no longer an issue. All of that practice frees me up to just be with the piece as I’m working as we speak and dance with each other. That connection can be quite an exhilarating experience sometimes and the joy I experience is what keeps me sewing, often through long hours into the night.

What are some ways that you’ve learned to cover up “mistakes” in your medium? Do you even see them as mistakes, or more as learning opportunities?

Why not leave a comment as to your thoughts on this posting. Please take a minute, fill out the form by clicking on the “comments/no comments link” at the top of the posting, and then share your ideas with the rest of us. We all grow when we share our thoughts and impressions, so why not join our growing community of those who appreciate art quilts and textile arts. We’d love to hear from you!

You can see more of my art work on my web site at www.fiberfantasies.com

To find out how to buy my art work, please check out “How to Buy my Art Work” in the “Pages” section to the right of this blog.