Tag Archive for art created by tapping into energy fields

“Milly’s Garden” – Meditation Art Quilt Completed

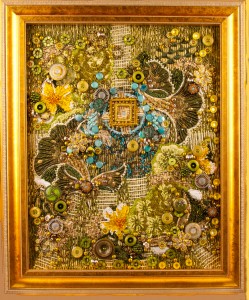
"Milly's Garden" - a contemporary art quilt based on tapping into a person's energy fieldTapping into a person’s energy field is not a usual way to see the image for creating an art quilt, but that’s exactly what I do for this series of “Meditation Art Quilts”. They’re designed to be the perfect place for that person to view, use as a meditation focus, and energetically play in. Such is the case of this latest piece, “Milly’s Garden”, a small art quilt, (16″ x 20″ or 41.5cm x 50 cm, without the frame.) The central portal is the entrance and exit to the garden, and if you go to the page on this blog that tells about them, there are the phrases to help you access any of the images that I’ve created so far. (Feel free to access the energy in any of the images that appeal to you; all can share!)

I was especially pleased with the bands of translucent. pale green ribbon that lead from the central portal. In this full pic, they are the bands with horizontal, pale green seed beads. Dark green lilies frame the central portal, and the edges of the tops of the flowers suggest green clouds. (This piece is for my Mother and her favorite color is green.)

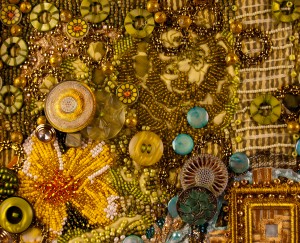
Detail(1) of "Milly's Garden" - an art quilt whose image is based on a person's energy fieldThis detail shot shows the edges of one of those green lilies and how I used seed beads to emphasize the shape of the flower. Tiny, cream colored pearls were shown along the outer edge of satin stitch that was commercially done on the fabric. I sewed dark olive beads vertically upwards from the base of the flower to suggest veins. To the right of the flower is some of the blue and gold metallic lace that was sewn around the central gold portal to also suggest clouds. It takes quite a bit of hand quilting to get lace with motifs as spread out as this to lie flat, so I used some metallic blue seed beads to add on to the lace and to weigh it down. There are two glass buttons from Czechoslovakia that I’ve written about in a previous blog. There’s a green one on the lower left edge, and black and gold one in the bottom middle in this photo. People always respond to these glass buttons, and reach out to touch them as they are so unusual. I always try to include some in each art quilt that I make because of the response that they elicit.
Detail (2) of Milly's Garden" - an art quilt based on a person's energy fieldThis detail shot, from the upper left of the portal, shows some of the extensive beading that I do. On the far right is a detail of the translucent, pale green ribbon that I mentioned above with it’s alternating horizontal rows of pale green seed beads. The yellow plumeria flower in the far, bottom left is a motif cut from fabric. It measures about 4″ x 4″ ( 10 cm x 10 cm) and is completely covered with seed beads. That intensive an amount of beading takes about 1 hour to complete 1 sq. in. (2.5 sq cm). In the middle of this shot are some pale green flowers where I left some of the fabric showing for future art historians. You can also see how I repeated lots of circles to help tie the composition together. The buttons are circular, there are some flat gold metal wreaths in the very top middle edge, and to the far left are some of those dyed shell circles that I stitched down with 6 strands of a darker shade of green in embroidery floss. By repeating shapes and colors, I can use a diverse amount of materials, and in my opinion, have them work as a balanced composition.

Creating these meditation gardens is great, good fun for me, as I feel that I am giving an image to something that the person is about, their own personal energy field. I already have some people interested in having me do one for them, so I hope that you get called to have one made for you. Please pass this blog on to like minded souls, whom you think would like to have a piece made for them. I’d love to create one for you, as we all need a personal space in which to mediate and reflect. What better place than a personal garden based on yourself in which to revel?

How do you go about making choices as to what appears in your art work? Which sorts of elements call to you the most when you’re designing in your own medium?

Why not leave a comment as to your thoughts on this posting. Please take a minute, fill out the form below or by clicking on the “comments/no comments link” at the top of the posting, and then share your ideas with the rest of us. We all grow when we share our thoughts and impressions, so why not join our growing community of those who appreciate art quilts and textile arts. We’d love to hear from you!… and PLEASE tell like minded souls about this blog! The more readers and contributors, the more I write.

You can see more of my art work on my web site at www.fiberfantasies.com (be patient as it loads; it’s worth it), my healing work at www.hearthealing.net and can find me on Google + , Facebook (for Transition Portals) Facebook (for Fiber Fantasies),  and Twitter.

To find out how to buy my art work, please check out “How to Buy my Art Work” in the “Pages” section to the right of this blog.

“Milly’s Garden” – a Meditation Garden Art Quilt

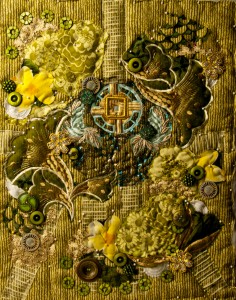
A shot of "Milly's Garden", an art quilt embellished with buttons and beads based on an energy's fieldThis photo shows the beginning of another one of my Meditation Garden series of art quilts. It was designed as a present for my mother. Her favorite color is green, so I lavished lots of different subtle shades of that color throughout the composition. The central orb motif that I’ve used for the other pieces in this series, has an aqua border, so I backed that area with a metallic gold and turquoise lace. There are some pale teal lace feathers on either side of the central portal or window that allows access to all of the parts of this garden. There are three golden yellow plumerias that make a triangle on the edges of the composition. In the upper left and bottom middle of the photo are some green, dyed shell circles that I’ve used in a lot of my pieces, as the central hole balances out the solid nature of the round buttons that I use. This piece, as you see it in this photo, is very early on in the construction, so there still a number of pins in place, holding down areas of fabric to keep them flat. I try to do most of the initial stitching in the middle of the piece, and work my way out to the edges. The pins can then be undone and repositioned as needed to allow for the piece to stretch or shrink as needed as more and more sewing and beading takes place.

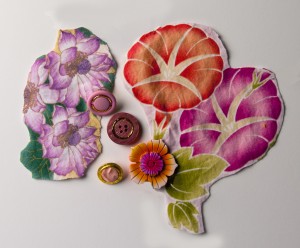
Fabric motifs and buttons that were considered for "MIlly's Garden" but not usedI have spoken in the past about how when I’m working on an art quilt, I slip into the Creative Free Flow or The Zone and the piece and I are one with each other. This State of Being is even more true with these Meditation Garden pieces, as I am tapping into the person’s energy field to create a unique visual image for that person in which to play and meditate. However, when I was looking around for fabrics with large flowers before actually starting this piece for my mother, these were some of the fabrics and buttons I bought. I love the morning glories and the two toned yellow and magenta button in the middle is actually made out of pressed sawdust. (I love the idea of recycling materials.) The lavender flower motif on the left I also thought would be perfect for this piece, None of these colors or materials ended up in the final piece. As I was cutting out the fabrics, which is what I always start with first, I was “told” what was needed, and none of these became part of this piece. (I do have a future commission in the works for which the morning glories will be perfect!)

Being an artist, no matter what medium you use, involves making changes. Some people would call them compromises, but I prefer to see them as the piece telling me how it wants to look. For me, I learned a long time ago, to quit fighting with the materials at hand and let them tell me how they want to be arranged. When I do that surrender, that’s when I get my best pieces.

Have you ever started out on a piece of art work and have it turn out to be completely different than from how you had originally thought it would be? How did you feel about the “changes” that were made. Do you see those adjustments as a natural evolution from how the piece was originally supposed to be in the first place?

Why not leave a comment as to your thoughts on this posting. Please take a minute, fill out the form below or by clicking on the “comments/no comments link” at the top of the posting, and then share your ideas with the rest of us. We all grow when we share our thoughts and impressions, so why not join our growing community of those who appreciate art quilts and textile arts. We’d love to hear from you!

You can see more of my art work on my web site at www.fiberfantasies.com (be patient as it loads; it’s worth it), my healing work at www.hearthealing.net and can find me on Google + , Facebook (for Transition Portals) Facebook (for Fiber Fantasies),  and Twitter.

To find out how to buy my art work, please check out “How to Buy my Art Work” in the “Pages” section to the right of this blog.
What I Learned While Making This Art Quilt -“Dalton’s Garden” (3)

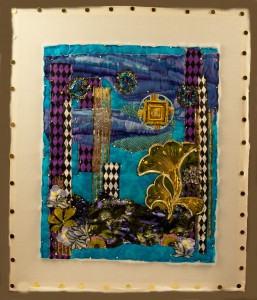
Fabric flowers used to disguise a crooked ribbonI’m often asked questions about how I think when I’m creating my art quilts, so I decided to start documenting some of the things I learn as I go along for a future book. I learn something new with each and every quilt, and “Dalton’s Garden”, one of my Meditation Garden series, is no exception. This series, based on my ability to tap into a person’s energy field, allows me to become “one” with the materials and play with the energy as ideas come into me. The result is a place where that person would want to energetically meditate and play.

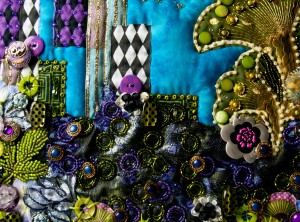
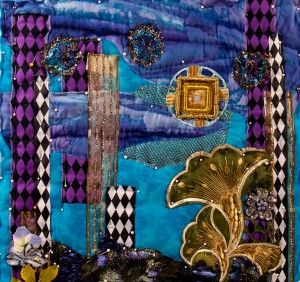
In the last two postings about this piece, I’ve mentioned that the black and white harlequin ribbon in the upper right was crooked. I was able to easily dislodge it from the surface about as far down as you can see in this photo. I then found some black and white ribbon roses in a local craft store.  By alternating them on either side of the vertical length of the ribbon, I was able to disguise the slight crookedness that was still left. (There was just too much already sewn on top of the ribbon further down its length to take the whole piece up.) Also, part of the problem when cutting into grosgrain ribbon, as I did for that section, is that the more that you handle it, the more likely it is to unravel. By having to minimize the need to rip out stitches, I was able to decrease that chance of the ribbon unraveling just by adding on those ribbon roses.

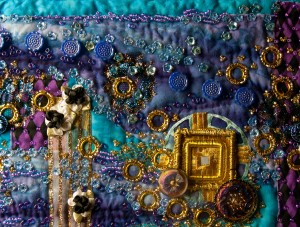
Chain maille links and beads in the cloudsThere are a number of aluminum chain maille jump rings in several colors out on the market now in craft shops. I like to use circles in my work (probably that button thing I’ve got going.) In the past, I have fastened down the circles with large stitches of 6 stranded embroidery floss. Here I choose to use 3-4 stitches of quilting thread in as close of a color as possible to that of the ring, and then encircled each ring with shiny, size 8 seed beads in a similar color. I’m really pleased as to how they surround the main portal in this shot, and suggest alternative windows to access the scene, or perhaps bubbles of laughter…or both!

I’m also pleased as to how I handled the horizontal clouds in the purple blue batik fabric. In the past two blogs about this quilt, I’ve talked about how I was afraid that I would cover up too much of the beautiful “drips” of dye. When my eyes are only a foot away from the surface on which I’m working, it’s easy to get caught up in the fun of the beading process. This time, instead of sewing right on top of certain areas with beads of similar colors, I sewed right above those areas in more blank spaces. This was especially successful with the dark areas that are so critical to have these clouds say “thunder clouds”. In those spaces, I sewed very large dark purple size E seed beads flat against the surface. That way you can see the different colored interior of the bead better than when they’re sewn with the sides showing.

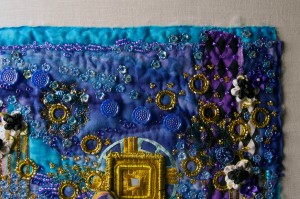
Chain maille links used in the waterIn the water at the bottom of this piece, I used two colors of the aluminum chain maille links. The dark green ones were encircled with a dark green, size 8 seed bead that had an amber center that makes those circles glow much more than they do in the this photo. For the purple chain maille links, I only has a more “flat” color of seed beads to encircle them, so those areas don’t glow as much as the green. The green lily along the top edge now has some flat, dyed shell beads that I’ve used to add shine along that surface. Underneath them, I used concave bead caps that have green pearls sewn in the center to accentuate the gold embroidery that came on the lilies. A problem that I need yet to solve is how to treat the lines of gold embroidery running the length of the lilies. My first inclination is to use size 10 seed beads ( the smallest I can still see to thread a needle that will go through them and fabric) and trace some of the lines running down the lily. Another problem I have to resolve is how to handle the bright aqua backing fabric. There are very subtle areas of slightly darker areas, and I think that I’ll used the edges of the batik swirls to suggest where and how to bead.

Working in any artistic medium is all about problem solving. How do I add this? What do I already have that will make this area work? How can I make my work stand out and speak with my style or voice? Answering all of these and similar questions are just some of the issues each artist must ask and then, in my opinion, listen to what their heart has to say about an answer for that moment. Perhaps in the next piece, the answers will change, but then, that’s what makes creating art so much fun…what’s going to happen next?

What have been some of your biggest discoveries been about your own medium? For myself, I find that I often learn more from other disciplines than I do from the one with which I’m most familiar, art quilting, so I’d really like to hear yout thoughts.

Why not leave a comment as to your thoughts on this posting. Please take a minute, fill out the form below or by clicking on the “comments/no comments link” at the top of the posting, and then share your ideas with the rest of us. We all grow when we share our thoughts and impressions, so why not join our growing community of those who appreciate art quilts and textile arts. We’d love to hear from you!

You can see more of my art work on my web site at www.fiberfantasies.com (be patient as it loads; it’s worth it) and can find me on Google + , Facebook,  and Twitter.

To find out how to buy my art work, please check out “How to Buy my Art Work” in the “Pages” section to the right of this blog.
“Dalton’s Garden” – the Beginning of a new Meditation Garden

"Dalton's Garden" - an art quilt designed for meditationI thought with this posting, that I would show you how I go about creating my art quilt Meditation Gardens. The images for this series is created by me tapping into a person’s energy field and then creating a visual representation of a place where they would be enthusiastic to energetically play and meditate. This one, “Dalton’s Garden” was designed to honor the new man who has come into my life, so creating the image has been pretty easy to do.(wry smile!)

The first thing I do before beginning one of these Meditation Gardens, is to tap into the person’s energy field and wait to be “shown” what place would be optimal for that person. With regard to Dalton, that was pretty easy, as we do a lot of energy work together. He lives in northern Florida now, and loves huge thunder storms, as the energy is electrifying and exciting for him, as it is for me, too. So instead of the usual sunny sky that I might put in other people’s gardens, he has some serious cumulonimbus thunderheads billowing in the background. I found a great purple blue batik fabric that looked as if the dye had run down the length of it. I cut irregular pieces of it and fastened them on horizontally to make the fingers of rain off in the distance in this scene.

The colored center section is made of three layers to make the quilt sandwich, the top embellished layer, the middle section composed of batting, and the backing fabric. Only the backing fabric, a white muslin extends outwards in these pieces. There, that fabric is attached to a frame with especially sharp thumbtacks that I got from the Canadian embroidery supply company, Berlin Embroidery Designs . Their web site is full of information and supplies for serious embroidery fanatics. The actual frame for this piece is larger than those sold by Berlin Embroidery, and came from another Canadian company, Hearthside Craftworks. They make beautiful floor embroidery frames that I lust after, but their simple 4 stretcher frame bars that I’m using here are elegant constructions of beautiful craftsmanship. Their dovetail joints fit perfectly tight so that you can get a true 90 degree angle for a perfect rectangle(or square). Both companies have wonderful customer service people, and while the shipping may be as much as the product if you’re not ordering very much, I found that it was worth it, as I haven’t found this quality of products for what I need here in the States.

Here, you can see more of the beautiful purple/blue batik that I used to make the rain clouds. I accentuated some of the horizontal lines with closely spaced quilting stitches tDetail of an art quilt created by tapping into a person's energy field, "Dalton's Garden"o make the blurry areas that looked like rain puff out some from the background. I hope that I can restrain myself and not cover up too much of the fabric with beads as I often do. The same sun/portal orb that I used in the original Meditation Garden, “Keith’s Garden” has a similar place in “Dalton’s Garden”. (It’s just too good of a design not to use as the entrance portal to “come into the scene”.) The center area is surrounded by a gold frame about 1.5″ or 4 cm square, with a larger metal frame that is 2″ or 5 cm square. That larger frame originally housed glass squares that were intended to enclose some thin collages, but I chose to cover them with gold, metallic floss using a blanket stitch to cover the metal frame.

I love to use commercial ribbons to create stripes in my work, and there are a lot of fun ones out there in the craft and fabric stores right now. I used two colors of harlequin diamond ribbons to suggest garden structures in the piece, such as trellises. However, no matter how much I stand back and look at the piece, I find it amazing that there are often some pieces that I don’t see to be crooked, such as the top of the black and white piece in the upper right until I see the art photographed. One of my favorite art/science books is VISION AND ART – THE BIOLOGY OF SEEING, by Margaret Livingstone. While it’s rather pricey, it is one of my most valued books in my collection. The extensive photographs and illustrations go a long way to explain how our eyes are not cameras, but do a lot of interpretation of what we’re seeing. A real camera doesn’t have that option, (or flaw) so it only records what is actually there. Fortunately, the crooked top of the black and white ribbon in the upper right of this photo had not been stitched down too much yet, so when you see it in the photos in the next blog, you’ll see that it was straightened. Otherwise, if it had already gotten too much embellishment to rip out stitches, (which I HATE to do) I would have added some sort of motif, probably lace or big buttons, to distract the eye from the crookedness.

I am incredibly excited about the beginning of this new Meditation Garden, and the man for whom it was designed at least professes to really like it. (I guess what’s he going to say since the relationship is rather new!) The next few weeks will have more photos as the piece progresses, but in the meantime, you can still access the commands on how to use the energy fields embedded in these art quilts by going to the page in the right hand navigational panel,entitled Transition Portals – Meditation Gardens. There you will find the phrases to say to allow you to tap into the energy fields in these pieces.

How do you tap into your own creative energy when you’re working in your own art medium? Do you have a structured method to access your Muses or do you go with the flow?

Why not leave a comment as to your thoughts on this posting. Please take a minute, fill out the form below or by clicking on the “comments/no comments link” at the top of the posting, and then share your ideas with the rest of us. We all grow when we share our thoughts and impressions, so why not join our growing community of those who appreciate art quilts and textile arts. We’d love to hear from you!

You can see more of my art work on my web site at www.fiberfantasies.com (be patient as it loads; it’s worth it) and can find me on Google + , Facebook, and Twitter.

To find out how to buy my art work, please check out “How to Buy my Art Work” in the “Pages” section to the right of this blog.