Archive for History of my Art

An Artist’s Bug-Out Bag

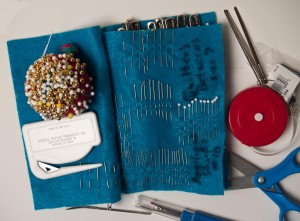
Tools in my artist's bug-out bagMy artist’s bug-out bag was not foremost on my mind while getting ready for Hurricane Sandy. I was busy prepping as much as I could to brace the house against the on-coming onslaughts of the forecast winds. Those tasks took up most of my time, but I did at least locate my small artist’s gear bag to grab in case I needed to evacuate.

The term, bug-out bag apparently comes from the Korean War, where it was a bag of necessities to grab in case your camp was about to be overrun. In a previous blog, I wrote about how I had put together a similar kit of art quilting supplies in case I needed to evacuate. The Peace Gardens that I had in the bag to make I envisioned giving me comfort while I was away from home. However, as Sandy approached, I only had time to make sure that the artist’s bag was with the bigger one that had some clothes and other necessities. However, after some of the debris outside was cleaned up here in Maryland, I decided to open the bag, and see if I still liked what I saw. Am I ever glad that I did, as there are some changes that need to be made.

In the above photo are some of the tools that I included in my bag. The first thing that I noticed was how pathetic the scissors were. I had put the bag together after the airline rules had come into play regarding the length of scissors that you could carry on a plane, but these are paper scissors. I did have an envelope opener, with its short razor blade in the finger of the curve that could be taken on a plane before short scissors were allowed back on, but paper scissors? You can’t cut threads neatly with those. I left them in my bag to pass on to a small child in my imagined future evacuation center, but added some better ones to my bag. The rest of the above supplies of lots of assorted needles and bodkins, seam ripper, tape measure, and pin cushion all were acceptable.
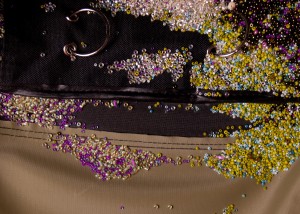
Loose beads in the bottom of the bug-out bagAnother reason that I was glad that I had re-opened my bug-out bag was the number of plastic bead bags that had burst over time being squashed against each other. This photo shows the hundreds of seed beads that were loose in the bottom of the main bag. Over time, I’ve had a few bead disasters that have resulted in spilled beads. You have no idea how well this little pieces of glass can bounce down an aisle on an airplane, so I’ve learned how to only take a few out at a time of one color and work just with them to minimize bead loss (and embarrassment.) I can only imagine what would have happened if I had opened my bag in an evacuation center, since from what I’ve seen on TV, you only get the space of a cot to call yours.
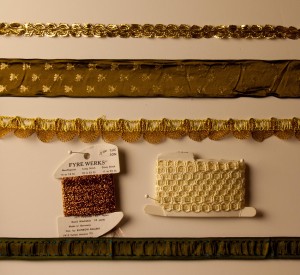
Ribbons, trim, and binding in my artist's bug-out bag What would an art quilt be without ribbons, trims, and the all important binding? The widest piece shown here is  a 2″ or 2.5 cm wide olive green, satin ribbon with bees on it. I bought a large spool a number of years ago, and have used it for all of the Peace Gardens banners. Since room is limited in my small bag, I only put snippets of what I have from my extensive collection in my studio. I only hope that if I did have to evacuate at some point, I would be grateful for what I did have with me and not bemoan what I had had to leave behind in the huge boxes in my studio.
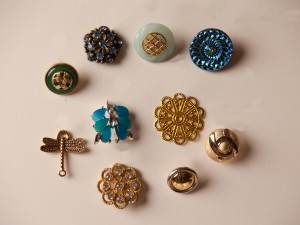
Samples of buttons and jewelry pieces in my bug-out bagSince I bill myself as “The Self-Proclaimed Button and Bead Queen of Maryland” on my web site, of course, I have buttons and snippets of jewelry in my bug-out bag. These are just some samples of the different color combinations that I have, as I wanted ones that would work in the idyllic garden theme that I’ve used in my other Peace Gardens banners. Again, choices had to be made, as I have boxes and boxes of possibilities in my studio, but size of the buttons was an important consideration, as the banners are small.

Besides the burst bead bags, the biggest surprise upon opening the bag after probably 3-4 years since I first put it together is that I only have one small art quilt in there. I had taken out three of the others and finished them to hang at some retreats that I’ve been on, and forgotten that I had not replaced them. I would have really been disappointed to have gotten to a shelter, only to find that I had a square foot of a quilt sandwich to work on, and it’s almost finished! More quilt sandwiches need to go in that bag!

My small canvas bag is actually a bait and tackle bag from a fishing shop. Measuring about 12″W x 8.5″T and 9″D when stuffed ( 30.5cm W x 21.5cmT and 23″D), there are a lot of art supplies in the 10 pounds (4.5kg) that it contains. I view it as my “teddy bear” that I would take me with me, and I could sit and sew and sew and sew to distract me from my surroundings and plight. I am so very, very grateful that I didn’t need to evacuate this time, but I am comforted that I have my bag ready….as soon as I put some more quilt sandwiches in it!

What art supplies would you put in your own version of a bug-out bag? How would you go about choosing what would go in it? 

Why not leave a comment as to your thoughts on this posting. Please take a minute, fill out the form below or by clicking on the “comments/no comments link” at the top of the posting, and then share your ideas with the rest of us. We all grow when we share our thoughts and impressions, so why not join our growing community of those who appreciate art quilts and textile arts. We’d love to hear from you!

You can see more of my art work on my web site at www.fiberfantasies.com (be patient as it loads; it’s worth it), my healing work at www.hearthealing.net and can find me on Google + , Facebook (for Transition Portals) Facebook (for Fiber Fantasies),  and Twitter.

To find out how to buy my art work, please check out “How to Buy my Art Work” in the “Pages” section to the right of this blog.

My Very First Quilt – Ever!

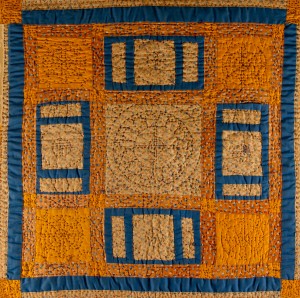
Nancy Smeltzer's first quilt - 1976I haven’t always used extensive embellishment on my art quilts. In fact, the first quilt I ever made was a traditional pieced quilt. (see the center section of that quilt in the photo on the left.) I was  in grad school at the Maryland Institute, College of Art, back in 1976, and since it was the Bicentennial Year, people were looking back at America’s roots. I was enrolled in an Art Teacher Ed program, because at the time, that was the only grad program they had in night school. I was fortunate, however, to be able to take most of my studio classes in textiles, and when I saw a class in traditional quilting, I thought that would be fun. I picked out my fabrics and embarked on making  a queen sized quilt.

“Queen sized quilt!” The teacher was dumbstruck that we all weren’t starting with a pillow, or a small throw for a sofa. She had been used to teaching more traditional classes around the community, and I think this was her first college class. She didn’t realize what big aspirations we had through our lack of ignorance of how the whole process worked. So, I picked a pattern and the sashes that go in between, calculated how much Variation of the traditional quilt block, "Cross and Crown", the first quilt made by Nancy Smeltzerof each color I would need, bought what seemed like miles of fabric, and set to cut out the pieces.

HOURS later, I had all of the little pieces stacked into the appropriate shapes and colors, and sat down to the sewing machine to begin to combine the pieces into the correct sequences. I’ve never been one for production line work. If I had, I would have sewn all of the little blue bars to the larger beige, flowered rectangles and then gone on to another combination. I wanted to see a whole square finished all at once, so while terribly inefficient, that’s how I proceeded. I very quickly found that I really needed to measure the seam allowances carefully, because 1/16″ or 3 mm off very quickly got magnified as I moved further and further across the quilt. This quilt, measuring 78″ x 80″, or 198 cm x 203 cm has a lot of pieces that vary in size due to inaccuracies in sewing seams.

The above central quilt square, ( 9″ x 9.5″ or 23.75cm x 24 cm) used throughout the quilt, is a variation of the traditional block, “Cross and Crown”. While usually the cross is oriented vertically, I decided to turn it on its side. I also didn’t use the points on the crown, just in case there are some traditional quilters reading this blog and saying, “That’s not a Cross and Crown!”. I hand quilted it with doubled black thread, as I didn’t want all of that hand work not to show up, but now, years later, I realize how stark that double thread is. The quilt was used on the bed for probably five years and washed a number of times before being retired, and has survived the wear and tear rather well.

In the part of North Carolina, USA, where I grew up, in years gone by, girls, such as my great grandmother, were often married at age 14. It was expected that a young girl would have 13 quilt tops pieced by the time her engagement was announced. Then her family and friends would get together to quilt them to create a lifetime supply of quilts, because once the young bride started having kids, there would be little time for anything more than functional sewing. That tradition had long died out by the time I was old enough to be dating in high school. It’s a good thing that the custom had faded, as my family would have been very, very cold, given my skill at piecing. I will probably never do another traditional quilt again, as I like applique so much better. However, I do admire the skill that is involved in created pieced quilts, especially ones with curved seams.

Have you ever started a big art project, gotten in the middle of it, and then realized that there was way more to it than you thought there would be? How did you deal with any sense of overwhelm that came up?

Why not leave a comment as to your thoughts on this posting. Please take a minute, fill out the form below or by clicking on the “comments/no comments link” at the top of the posting, and then share your ideas with the rest of us. We all grow when we share our thoughts and impressions, so why not join our growing community of those who appreciate art quilts and textile arts. We’d love to hear from you!

You can see more of my art work on my web site at www.fiberfantasies.com and can find me on Google + , Facebook,  and Twitter.

To find out how to buy my art work, please check out “How to Buy my Art Work” in the “Pages” section to the right of this blog.
A Quilt from a Grandmother I Never Knew

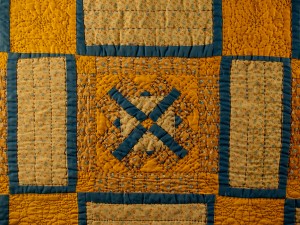
Part of a handmade quilt my grandmother made for a German children's orphanageApparently quilting runs in my blood. This photo is part of the top of a handmade quilt that a grandmother? great grandmother? made for a German children’s orphanage in or near Youngstown, Ohio in the USA. The family story as it was told to me by my aunt, says that my grandmother made over 100 of these simple quilts for the unfortunate children. It’s extremely well worn and has many stains all over it. The piece was hand seamed, appliqued, and quilted. The 3 squares shown here are from part of one side that is not too faded to photograph. The entire quilt, measures 77″ x 67″ or 195.5cm x  170 cm. The batting is very thin, which technically makes this piece a coverlet rather than a quilt.

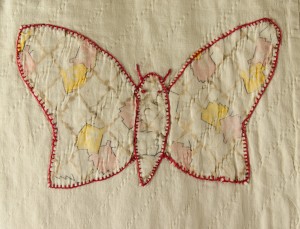
Detail of 1 square in a handmade quilt my grandmother made for a German children's orphanageHere is a detail of another square that wasn’t too faded to photograph. (Each square measures 9″ or 23 cm square.) The edges of the butterfly are turned under and then a closely spaced blanket stitch keeps the printed fabric edges in place. Two little French knots have been added for eyes, and two short rows of running stitches form the antennae. The overall effect is rather perky and cheerful and makes me smile when I take the quilt out of storage every six months to refold it so that there won’t be permanent fold marks where the from the weight of the fabric over time.

This quilts was done rather quickly as I imagine that there were many children who needed to be taken care of. I like to imagine that some child clutched it in the middle of the night to keep the darkness away. My aunt didn’t even give me the quilt or tell me the story of my unknown grandmother until I had been quilting about 5-6 years, so I didn’t start quilting because of her. While I never met my ancestor, it’s interesting to note that she liked butterflies, too. (They’re one of my favorite creatures on the planet.) So, I guess that some things do run in families.

What family stories do you have about things made in your family? Are you recording the details so that some future generation will know more about them?

Why not leave a comment as to your thoughts on this posting. Please take a minute, fill out the form below or by clicking on the “comments/no comments link” at the top of the posting, and then share your ideas with the rest of us. We all grow when we share our thoughts and impressions, so why not join our growing community of those who appreciate art quilts and textile arts. We’d love to hear from you!

You can see more of my art work on my web site at www.fiberfantasies.com and can find me on Google + , Facebook,  and Twitter.

To find out how to buy my art work, please check out “How to Buy my Art Work” in the “Pages” section to the right of this blog.

Sewing Afflictions – the Pain of Being a Quilter!”

A recent art quilter’s blog spoke of the pain of sewing through her finger with a sewing machine needle while working on a piece. I wrote back a sympathy comment, and confessed to having done the same thing twice. Yes, my friends, art quilts are not for the meek of heart. There are a number of occupational hazards that face the serious fabric artist. Besides sewing thorugh my fingers, I’ve also gotten so caught up in what I was doing that I’ve nipped off small chunks of finger tips and sliced into the web of my hand with scissors. Just as with dull knives in a kitchen can be dangerous, the same can be true with scissors, as they tend to “bounce” off of the fabric. After patching up one of my scissor slices, I usually get out the sharpener, and clean up those dull edges of the blades so that they’ll go in the direction that I intend them to go.(Why do I always do that chore after the fact?)

Since I hate to wear thimbles when I sew, the pads of the second and third fingers on both hands get quite a few pricks. This is especially true if I’m sewing through many layers or unusual materials, such as some plastic record film that I was attaching to a recent piece. The result makes for some rather ragged calluses, that look and feel rather yucky when I shake hands with someone. (I imagine them thinking – “O-O-Ohhh! What’s wrong with her hands?”) I’ve found a rather good callus remover that is meant for cracked heels, so I “sand” my rough fingertips every time I shower in order not to gross out some new acquaintance with my scaly skin.

Eyesight strain can be another problem. It’s gotten so that I try not to use black thread or beads , especially since I tend to sew late in the day. There will be a certain time of night, after sewing for several hours, when, no matter how bright the light, I just can’t see to thread the needle anymore. Sometimes, switching to a section of the piece that has lighter colors helps, but sometime, I just have to stop sewing for that day.

Perhaps the most drastic thing that has happened to me because of my passion for sewing was having to have carpal tunnel surgery on both wrists. This was back in the early 80s, when I had just started as a professional quilter. I had raced to get a piece finished in a month with intricate hand quilting for an invitational exhibition that I really wanted to be in, and while the piece was finished, it almost did my hands in. After several vitamin treatments, hand splints, nerve conduction tests, and rest, it became obvious that the surgery needed to be done.

The surgeon, a man, suggested that I have both hands done at once, and I looked at him as if he were crazy. After all, there are only so many things you can ask a husband to do, and I didn’t think personal hygiene fit into that list. So, one hand at a time it was, starting with my right hand which hurt the worst. I had the bright idea of decoupaging my cast with a small sample of my art work, and then sending out press releases about how artists suffer to do their creations, as carpal tunnel was just starting to become a diagnosed issue. I made a small pattern of the geometric style that I was doing at the time, shellacked it, and set it aside to attach to my cast after my surgery. A friend was to come over , take a photo of me and my decorated cast, and I was ready to tell the world my tale of woe.

However, I didn’t discuss my plans with the surgeon, so I was very much surprised to find out when I awoke in the recovery room that he had given me a soft cast. That meant that I had a hard base form that went under my wrist and forearm to stabilize the two, keeping my hand at the proper angle for healing. A long, stretchy Ace bandage was wrapped around that form to hold it in place. That way, the whole thing could be taken off to take a shower. let my skin breathe,etc. The surgeon was very much surprised that I was disappointed that I didn’t have a cumbersome. hard plaster cast on and sent me home to recover with quite a perplexed look n his face.

What my friend and I decided was that she would use straight pins to fasten the stiff, flat decoupaged design onto the soft layers of my “cast”, and then take the photo from far enough away that no one would be able to tell the wrapping wasn’t a hard plaster version. The story of my decorated cast was picked up by the “Washington Post” and the “Baltimore Sun” and I got some nice publicity out of the press release that I had sent out. The photo of me as a poor artist, suffering from her passion as she follows her muse, making the best of her affliction, yadda, yadda, is shown above. I thought it was rather clever of me to turn adversity into some good PR, since I was going to have to have the surgery anyway. By the way, the surgery was a success for both wrists, and I’m glad that I had it done before I had created too much nerve damage.

Why not leave a comment as to your thoughts on this piece. The registration form is just to prevent spammers, not to collect any of your information.

You can see more of my art work on my web site at www.fiberfantasies.com .

To find out how to buy my artwork, please check “How to Buy my Art Work” in the “Pages” section to the right of this blog.
“Everybody has to start somewhere!”

Well, here it is…the first public viewing of my earliest surviving attempt at emboidery. This small piece, about 4 inches (10cm) square , must have been created for a Girl Scout badge. There’s no doubt as to how old I was, as I proudly stitched that I was “10 1/2”.(Remember when those 1/2 years were so important when you were little?) The stains and broken threads speak as to how the piece was stored (read – not very well), but my mother gave it to me a number of years ago. I kept it to remind me that I’ve come a long ways, yet there are still some early signs that I would be obsessive with my work in my later years.

The center flower motif speaks to my love of plants, a common theme in many of my art quilts. One of my earliest memories is of being hustled out of a garden show where my Father had gone to photograph the flowers. I think that he must have been intrusted with watching me for the afternoon to give my mother a break. While he was absorbed with what he was seeing through his lens, my little 3 year old hands were busy picking as many flowers as I could stuff into two fists. I didn’t understand why there would be flowers around if you couldn’t pick them, but I did catch on quickly that I had committed a social faux pas as I got hauled out of there very quickly, stuffed  under my father’s arms like a football.

There are of course, beads on the piece. Just a tiny row of them, but again everybody has to start somewhere. I was quite fortunate in that my mother always supplied me with lots of art and craft materials. She sewed all of my clothes until I was old enough to protest that I wanted “store clothes” like the other girls. I can remember going to the fabric store in August to pick out the fabrics I liked for the dresses for the upcoming school year (of course, we wore dresses to school back then!) I would play with the accumulated threads that had piled up under the cutting tables while my mother had the lengths of fabric cut for my upcoming new wardrobe. There was quite a wealth of pretty colored threads to be found on the store floor, if you crawled around enough. Sort of like the kind of nest I would make if I were a bird.

Here’s another early attempt at fiber art that my mother kept. I was probably about 12 years old when this was made and I imagine that it too was for another Girl Scout project. I’ve always loved cats, bebgining with my first one “Cotsie” that my “boyfriend” gave me when I was in kindergarden. I never had a “binky” that I remember when I was little, but I did rub cotton balls between my fingers for quite a long time, instead of sucking my thumb. (hence the name of my first cat). This little piece ( 9″ T x 10″ W, 23cm T x 25.5cm W) has lots of details such as lace trim peeking above the pockets on the wasicoat. The shoes have a little flower trim, as does the hair ribbon. A little mousey capture is proudly displayed in one front paw.Pipe cleaner whiskers add some realism to this creation.

Many of the black spots were glued on, and have fallen off, leaving a brown residue. Archival glue was unknown to me at the time, and reminds me to not use glue if I can help it on my present day works, as eventually, it will leach out on to the surrounding fabrics.

I think you can see from the above two examples that I was drawn to fabrics and sewing at an early age. When did you first start to make art and what was it like?  We’d love to hear about your early attempts to express yourself visually.

You can see more of my more recent works at www.fiberfantasies.com